Fixing a Leaky Bathroom Sink Faucet: Single Handle Delta
A leaky bathroom sink faucet is a common plumbing issue that can waste water and increase your utility bills. If you're experiencing a leak from your Delta single handle faucet, don't worry; it's a relatively easy fix that you can tackle yourself with a few simple tools.
Here's a step-by-step guide on how to fix a leaky Delta single handle bathroom sink faucet:
Tools and Materials You'll Need:
- Allen wrench
- Phillips head screwdriver
- Pliers
- Replacement cartridge (if necessary)
Step 1: Turn Off the Water Supply
Before starting any repairs, it's crucial to turn off the water supply to the faucet. Locate the shut-off valves beneath the sink and turn them clockwise to close them.
Step 2: Remove the Handle
Using the Allen wrench, loosen the set screw located at the base of the handle. Once the screw is loose, pull the handle straight up to remove it.
Step 3: Remove the Escutcheon
The escutcheon is the decorative ring around the base of the faucet. Use a Phillips head screwdriver to remove the screws holding it in place and lift it off.
Step 4: Loosen the Bonnet Nut
The bonnet nut is located just above the escutcheon. Use pliers to loosen it counterclockwise, but do not remove it completely.
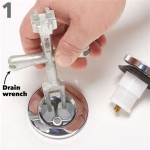
Step 5: Remove the Cartridge
Grasp the cartridge with pliers and pull it straight up to remove it from the faucet body. Inspect the cartridge for any signs of damage or wear.
Step 6: Install a New Cartridge (If Necessary)
If the cartridge is damaged or worn, you will need to replace it with a new one. Align the new cartridge with the faucet body and push it into place. Ensure it fits snugly and is seated correctly.
Step 7: Reassemble the Faucet
Once the cartridge is replaced or the old one is reinstalled, reassemble the faucet by following the steps in reverse. Tighten the bonnet nut clockwise using pliers, replace the escutcheon and secure it with screws, and finally, insert the handle and tighten the set screw.
Step 8: Turn On the Water Supply and Test
Turn on the water supply and check if the leak has been resolved. If the faucet is still leaking, repeat the steps above and check for any loose connections or damaged components.
Additional Tips:
- If the leak is coming from the base of the faucet, it may be caused by a loose O-ring. Replace the O-ring to fix the leak.
- If the leak is coming from the spout, it may be caused by a worn washer. Replace the washer to stop the leak.
- If you're not comfortable performing the repair yourself, call a licensed plumber for assistance.

How To Rebuild A Delta Single Handle Faucet

How To Fix A Leaky Delta Style Bathroom Faucet

Simple Ways To Fix A Leaky Delta Bathroom Sink Faucet

Simple Ways To Fix A Leaky Delta Bathroom Sink Faucet

Diy And Save How To Repair Leaking Single Handle Faucets Kitchen Bath

Delta Repair Kit For Single Handle Faucets

How To Fix Leaky Bathroom Handle Delta Faucet Model 4530 Series Hard Water

Delta Rless Bathroom Single Handle Faucet Repair

Easy Fix Delta Faucet Drip Repair

How To Repair A Single Handle Kitchen Faucet Diy Family Handyman