Repair Single Handle Bathroom Sink Faucet
Repairing a single-handle bathroom sink faucet is a relatively easy task that can be completed in a few simple steps. The essential aspects of this repair include identifying the problem, gathering the necessary tools and materials, disassembling the faucet, replacing the faulty parts, reassembling the faucet, and testing it for proper function. By following these steps carefully, you can quickly and easily fix a leaky or malfunctioning single-handle bathroom sink faucet.
Before beginning, it is important to understand the part of speech of the keyword "Repair Single Handle Bathroom Sink Faucet." In this case, "Repair" is a verb that describes the action of fixing or mending something. This verb is the main focus of the article, and the other words in the keyword phrase provide additional information about the specific type of repair being discussed.
The essential aspects of repairing a single-handle bathroom sink faucet include:
- Identifying the problem: The first step in repairing a faucet is to identify the problem. This can be done by observing the symptoms of the problem, such as a leak, drip, or difficulty operating the handle.
- Gathering the necessary tools and materials: Once the problem has been identified, you will need to gather the necessary tools and materials to complete the repair. These tools may include a wrench, screwdrivers, pliers, and replacement parts.
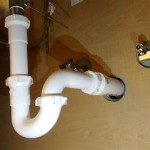
- Disassembling the faucet: The next step is to disassemble the faucet. This will involve removing the handle, spout, and any other components that are necessary to access the faulty parts.
- Replacing the faulty parts: Once the faucet has been disassembled, you will need to replace the faulty parts. This may involve replacing the cartridge, O-rings, or other components that are causing the problem.
- Reassembling the faucet: Once the faulty parts have been replaced, you can reassemble the faucet. This will involve putting all of the components back together in the reverse order that they were disassembled.
- Testing the faucet for proper function: Once the faucet has been reassembled, you should test it for proper function. This will involve turning on the water and checking for any leaks or drips. You should also operate the handle to make sure that it is working smoothly.
By following these steps, you can quickly and easily repair a single-handle bathroom sink faucet. This will save you money and time, and it will also help to keep your bathroom in good working order.

How To Rebuild A Delta Single Handle Faucet

Bathroom My Single Handle Faucet Is Leaking Or Dripping

How To Repair A Leaky Lavatory Faucet

Valley Single Handle Bathroom Faucet Repair Parts

How To Fix Moen Single Handle Faucets

Valley Single Handle Bathroom Faucet Repair Parts

Repair Parts For One And Two Handle Delta Bathroom Faucets

How To Fix A Leaky Bathroom Sink Faucet

How To Fix A Leaky Single Handle Sink Faucet

How To Replace The Seats Springs In A Single Handle Faucet Repair And