Fix a Leaking Bathroom Sink Tap: A Comprehensive Guide
A leaking bathroom sink tap can be an annoying and potentially costly problem. Fortunately, it's often a simple fix that can be done by yourself. Here's a step-by-step guide to help you troubleshoot and repair a leaky sink tap:
Identifying the Source of the Leak
Before you start fixing the leak, it's important to identify the source. Here are some common culprits:
- Worn-out washers: Washers are small rubber or plastic seals that prevent water from leaking around the tap handle.
- Faulty O-rings: O-rings are rubber seals that create a watertight seal between the tap body and the spout.
- Loose nuts or screws: If the nuts or screws that hold the tap in place are loose, water can leak from the base of the tap.
- Damaged tap body: In rare cases, the tap body itself may be damaged, leading to a leak.
Tools and Materials
Once you've identified the source of the leak, you'll need the following tools and materials:
- Adjustable wrench or pliers
- Flathead screwdriver
- Phillips head screwdriver
- Replacement washers or O-rings
- Teflon tape
- Cloth or paper towels
Step-by-Step Repair Instructions
Follow these steps to repair the leaking tap:
- Turn off the water supply: Use the shutoff valves under the sink to turn off the water supply to the tap.
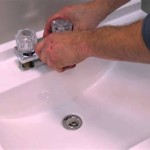
- Remove the tap handle: Use a flathead screwdriver to pry off the cap on the tap handle. Then, use an adjustable wrench or pliers to loosen the nut that holds the handle in place and remove the handle.
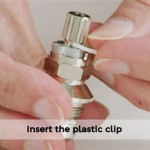
- Replace the washers or O-rings: Remove the old washers or O-rings and replace them with new ones. Make sure to use the correct size and type of washers or O-rings.
- Reinstall the tap handle: Place the new washers or O-rings in place and reinstall the tap handle. Tighten the nut securely, but do not overtighten it.
- Tighten the packing nut: If the leak is coming from the base of the tap, use an adjustable wrench or pliers to tighten the packing nut around the tap stem. Do not overtighten it, as this can damage the stem.
- Apply Teflon tape: If the leak is coming from the connection between the tap body and the spout, apply Teflon tape to the threads of the spout before reattaching it.
- Turn on the water supply: Once you've completed the repair, turn on the water supply and check for leaks. If there are still leaks, repeat the steps above or contact a plumber.
- If you're not sure about any of the steps, consult a professional plumber.
- Always wear gloves and safety glasses when working on plumbing.
- If the leak is coming from the base of the tap and you can't tighten the packing nut, it may indicate a damaged tap stem. In this case, you'll need to replace the tap stem.
- Regular maintenance, such as cleaning the tap aerator and replacing washers or O-rings, can help prevent leaks from occurring.
Additional Tips

How To Fix A Leaky Faucet True Value

How To Fix A Dripping Tap Living By Homeserve

How To Fix A Dripping Tap

Properly Fixing A Leaky Sink Faucet Wallside Windows

5 Reasons Your Faucet Is Dripping Water How To Fix It

How To Fix A Leaky Bathroom Sink Faucet

5 Reasons Your Faucet Is Dripping Water How To Fix It

How To Fix A Leaky Faucet The Home Depot

How To Fix A Leaky Tap In 6 Steps Bluemonday Rightio

How To Fix Pipework A Tap Faucet Leaking Under The Sink
Related Posts