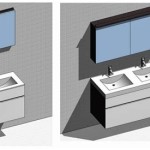
How to Install a Bathroom Sink Faucet and Drain
Installing a bathroom sink faucet and drain may seem like a daunting task, but with the right tools and a little patience, you can easily complete the job yourself. Here's a step-by-step guide to help you through the process:
Step 1: Gather Your Tools and Materials
Before you begin, gather all the necessary tools and materials. You'll need:
- Faucet wrench or adjustable wrench
- Basin wrench or channel lock pliers
- Plumber's putty
- Teflon tape
- New faucet and drain assembly
- Screwdriver
- Bucket or bowl
Step 2: Turn Off the Water Supply
Locate the water supply valves beneath the sink and turn them off. Open the faucet to release any residual water in the lines.
Step 3: Disconnect the old Faucet and Drain Assembly
Use the basin wrench or channel lock pliers to disconnect the water supply lines from the old faucet. Then, use the faucet wrench to remove the mounting nuts and lift the old faucet out of the sink.
Disconnect the drain assembly by loosening the nuts under the sink.
Step 4: Prepare the New Faucet and Drain Assembly
Apply a thin bead of plumber's putty around the base of the new faucet. Wrap the threads of the water supply lines with Teflon tape.
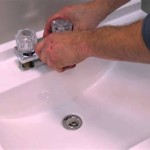
Step 5: Install the New Faucet
Insert the new faucet into the sink hole and tighten the mounting nuts. Be sure to use enough force to create a watertight seal, but avoid overtightening.
Step 6: Install the Water Supply Lines
Connect the water supply lines to the new faucet and hand-tighten the nuts. Avoid using a wrench or pliers, as this can damage the lines.
Step 7: Test for Leaks
Turn on the water supply and check for any leaks around the base of the faucet and the water supply lines. If you find a leak, tighten the connections as needed.
Step 8: Install the Drain Assembly
Place the rubber washer and metal washer on the drain assembly.
Insert the drain assembly into the sink hole and tighten the drain nut from below.
Tighten the nuts until the drain is secure but not overly tight.
Step 9: Test the Drain
Pour water into the sink and check for any leaks around the drain assembly.
If you find a leak, tighten the drain nut as needed.
Step 10: Finishing Touches
Clean up any excess plumber's putty from around the faucet and drain.
Enjoy your new bathroom sink faucet and drain!

How To Install Huaraz Deck Mount Bathroom Sink Faucet

How To Install A Bathroom Sink Faucet And Drain

Diy How To Replace And Install A Bathroom Sink Faucet

Step By Tutorial How To Install A New Bathroom Sink Faucet Maggie Mcgaugh

How To Remove And Install A Bathroom Faucet

How To Install A Bathroom Sink Step By Guide

How To Install A Vessel Sink Faucet

How To Replace Install Bathroom Sink Faucets Easy Diy Home Upgrade

How To Install Bathroom Sink Drain Queen Bee Of Honey Dos

Guide To A Bathroom Faucet Drain Replacement Step By
Related Posts