How to Install a P-Trap for Bathroom Sink: A Comprehensive Guide
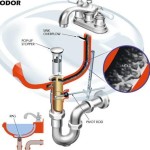
Replacing or installing a P-trap under your bathroom sink is a relatively simple plumbing task that can be completed with a few basic tools and some DIY know-how. A P-trap is a curved pipe that connects the drain outlet of your sink to the drainpipe, preventing sewer gases from escaping into your bathroom. Here is a step-by-step guide to help you install a P-trap for your bathroom sink:
Step 1: Gather Your Tools and Materials
Before you begin, ensure you have the following tools and materials on hand:
- P-trap kit (includes P-trap, slip nuts, and washers)
- Adjustable wrench
- Plumber's putty or Teflon tape
- Bucket or bowl
- Flashlight (optional)
- Safety glasses
Step 2: Prepare Your Sink Drain
Start by placing the bucket or bowl beneath the sink drain to catch any dripping water.
Loosen the slip nuts that hold the old P-trap in place, using the adjustable wrench. If the nuts are rusted or corroded, you may need to use a penetrating oil to loosen them.
Once the slip nuts are loose, remove the old P-trap and discard it.
Step 3: Apply Plumber's Putty or Teflon Tape
Apply a generous bead of plumber's putty or wrap Teflon tape around the threads of the new P-trap inlet.
This will help create a watertight seal between the P-trap and the sink drain.
Step 4: Install the New P-Trap
Position the new P-trap under the sink drain, ensuring that the curved portion of the trap is facing down.
Hand-tighten the slip nuts onto the P-trap inlet and outlet.
Use the adjustable wrench to tighten the slip nuts further, but avoid overtightening.
Step 5: Connect the Drainpipe
Connect the outlet end of the P-trap to the drainpipe using a slip joint connector.
Tighten the slip joint connector using the adjustable wrench.
Step 6: Check for Leaks
Turn on the water supply to your sink and allow the water to run for a few minutes.
Use a flashlight to inspect the connections for any leaks.
If you find any leaks, tighten the slip nuts or slip joint connector further.
Step 7: Clean Up
Once you're satisfied that there are no leaks, clean up any remaining water or debris from the installation.
Dispose of the old P-trap and any other discarded parts properly.
Congratulations! You have successfully installed a P-trap for your bathroom sink. If you encounter any difficulties during the installation process, it's always best to consult a qualified plumber for assistance.
How To Install P Trap And Bathroom Sink Drain Piping Easy Installation For Beginners

How To Install A Plastic Bathroom P Trap

How To Install The P Trap Under A Sink Dummies

Bathroom Sink Plumbing Installation Diy Montreal

How To Replace S Trap With A P Drain Plumbing Traps Work Air Actuated Valve Install

Bathroom Sink Plumbing Installation Diy Montreal

How To Install A P Trap

How To Install A Plastic Bathroom P Trap

How To Install A P Trap

P Trap What Is It Why Matters A Sacramento Tech Explains Ace Plumbing Heating And Air Conditioning
Related Posts