How to Change a Faucet in a Bathroom Sink: a Comprehensive Guide
Replacing a bathroom sink faucet might seem like a daunting task, but it's actually a relatively straightforward process that can be completed in a few hours. With the right tools and a bit of know-how, you can easily update your bathroom's look and improve its functionality.
Essential Tools and Materials:
- Adjustable wrench or basin wrench
- Phillips head screwdriver
- New faucet
- Plumber's putty or Teflon tape
- Bucket or bowl
- Rags or towels
Step 1: Turn Off the Water Supply
Before you begin any work, it's crucial to turn off the water supply to the sink. Locate the shut-off valves under the sink and close them both.
Step 2: Disconnect the Water Lines
Use the adjustable wrench to disconnect the water supply lines from the faucet. Hold the faucet body to prevent it from turning. It's normal for some water to drip from the lines, so have a bucket or bowl ready to catch it.
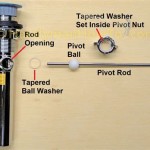
Step 3: Remove the Old Faucet
Locate the mounting nuts that secure the faucet to the sink. Using the adjustable wrench or basin wrench, carefully loosen the nuts and remove the old faucet.
Step 4: Clean the Sink Surface
Thoroughly clean the sink surface where the new faucet will be installed. Remove any old plumber's putty or Teflon tape and clean the area with a damp cloth.
Step 5: Apply Plumber's Putty
Roll out a small amount of plumber's putty and form it into a rope. Place the putty around the base of the new faucet's mounting flange.
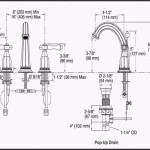
Step 6: Position and Install the New Faucet
Carefully position the new faucet over the putty and gently press it into place. Secure the mounting nuts by hand-tightening them, then use the wrench to further tighten them.
Step 7: Reconnect the Water Lines
Reconnect the water supply lines to the new faucet and hand-tighten them. Use the adjustable wrench to snugly tighten the connections, but avoid overtightening.
Step 8: Turn On the Water Supply
Turn on the shut-off valves under the sink to restore the water supply. Check for any leaks around the faucet and connections. If necessary, adjust the mounting nuts or add more plumber's putty.
Step 9: Final Touches
Install the faucet handle and any decorative accents. Run the water to check for proper operation. Make sure both hot and cold water flow smoothly and adjust the temperature as desired.
Tips and Considerations:

How To Replace A Bathroom Faucet Removal And Installation

How To Replace A Bathroom Faucet Home Repair Tutor

Replacing A Bathroom Faucet Fine Homebuilding

How To Replace A Bathroom Faucet Removal And Installation

Diy How To Replace A Bathroom Sink Faucet Remove Install

How To Install A Bathroom Faucet The Home Depot

How To Install A Bathroom Faucet The Home Depot

How To Replace A Bathroom Faucet Tinged Blue

How To Replace A Bathroom Faucet Removal And Installation

How To Replace Your Bathroom Faucet Plumbcraft Series With Penny
Related Posts