Essential Aspects of Bathroom Faucet Dripping Repair
Bathroom faucet dripping is a common household issue that can waste water and lead to higher utility bills. It is essential to address this problem promptly to avoid costly repairs and water damage. This article will focus on the critical aspects of bathroom faucet dripping repair, providing a comprehensive guide to help you effectively resolve this issue.
Before beginning the repair, it is crucial to identify the source of the drip. Common causes include worn-out washers, defective O-rings, or damaged valve seats. Once the source is identified, you can proceed with the repair using the appropriate tools and materials.
1. Gather the Necessary Tools and Materials
To repair a dripping bathroom faucet, you will need the following tools and materials:
- Adjustable wrench
- Phillips and flathead screwdrivers
- Replacement washers and O-rings (if required)
- Plumber's tape
- Paper towels or rags
2. Shut Off the Water Supply
Before starting any repair work, it is essential to shut off the water supply to the faucet. Locate the shut-off valves under the sink and turn them clockwise to close them.
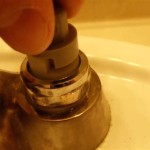
3. Disassemble the Faucet
Once the water supply is shut off, disassemble the faucet by following these steps:
- Use the adjustable wrench to loosen the packing nut.
- Remove the handle by unscrewing the set screw with a screwdriver.
- Pull out the cartridge or stem assembly.
4. Replace Worn Components
Inspect the washers, O-rings, and valve seats for signs of wear or damage. If any of these components are damaged, replace them with new ones.
5. Reassemble the Faucet
After replacing the worn components, reassemble the faucet by following these steps in reverse order:
- Insert the cartridge or stem assembly.
- Tighten the packing nut.
- Reattach the handle.
6. Turn On the Water Supply and Check for Leaks
Turn on the water supply and check for any leaks. If there are any leaks, tighten the packing nut or other connections as necessary.
Conclusion
Repairing a bathroom faucet drip is a straightforward task that can be completed with the right tools and materials. By following the essential steps outlined in this article, you can effectively resolve this issue and prevent further water damage and utility bill increases. If you encounter any difficulties during the repair process, do not hesitate to consult a qualified plumber for assistance.

5 Reasons Your Faucet Is Dripping Water How To Fix It

Part 1 Of 2 How To Fix A Dripping Faucet

How To Fix A Leaky Faucet True Value

5 Reasons Your Faucet Is Dripping Water How To Fix It

Why Is My Faucet Dripping Nonstop

Properly Fixing A Leaky Sink Faucet Wallside Windows

How To Fix A Leaking Bathroom Faucet Quit That Drip

How To Fix A Leaking Bathtub Faucet Diy Family Handyman

How To Fix A Dripping Moen Faucet Howtolou Com

How To Fix A Leaky Faucet Guides For Every Design And Style
Related Posts