Fixing a Leaking Bathroom Faucet From the Hot Water Handle
A leaky faucet can be a minor annoyance or a major problem, depending on the severity of the leak. A leaking bathroom faucet that is coming from the hot water handle can be caused by a number of different issues, but the most common causes are a worn out washer, a damaged O-ring, or a faulty cartridge. In most cases, these issues can be fixed relatively easily with a few simple tools and some basic plumbing knowledge.
If you are not comfortable working on plumbing fixtures, it is always best to call a qualified plumber to fix the leak. However, if you are handy and have some basic plumbing skills, you may be able to fix the leak yourself. Here are the steps on how to fix a leaking bathroom faucet from the hot water handle:
1. Gather your tools and materials
You will need the following tools and materials to fix a leaking bathroom faucet:
- Adjustable wrench
- Phillips head screwdriver
- Flat head screwdriver
- Replacement washer (if necessary)
- Replacement O-ring (if necessary)
- Replacement cartridge (if necessary)
- Plumber's putty
- Rags
2. Turn off the water supply
The first step is to turn off the water supply to the faucet. There are usually two shut-off valves under the sink, one for the hot water and one for the cold water. Turn both valves clockwise to shut off the water.
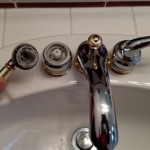
3. Remove the handle
Once the water is turned off, you can remove the handle from the faucet. Most handles are held in place by a screw or a cap. Use a screwdriver to remove the screw or cap, and then pull the handle straight up to remove it.
4. Inspect the washer
Once the handle is removed, you will be able to see the washer. The washer is a small, rubber disc that sits between the handle and the faucet body. If the washer is worn out, it will need to be replaced.
5. Remove the O-ring
If the washer is not worn out, the leak may be caused by a damaged O-ring. The O-ring is a small, rubber ring that sits between the faucet body and the handle. To remove the O-ring, use a flat head screwdriver to gently pry it out of its groove.
6. Replace the washer or O-ring
If the washer or O-ring is damaged, it will need to be replaced. To replace the washer, simply insert a new washer into the groove in the handle. To replace the O-ring, insert a new O-ring into the groove in the faucet body.
7. Reassemble the faucet
Once the washer or O-ring has been replaced, you can reassemble the faucet. First, apply a small amount of plumber's putty to the threads of the faucet body. Then, screw the handle back onto the faucet body. Tighten the handle until it is snug, but do not overtighten it.
8. Turn on the water supply
Once the faucet is reassembled, you can turn the water supply back on. Check for leaks around the handle. If there are no leaks, the repair is complete.
If you have followed these steps and the leak is still not fixed, there may be a more serious problem with the faucet. In this case, it is best to call a qualified plumber to diagnose and repair the problem.

Bathroom Faucet Is Leaking Or Dripping

How To Fix A Leaking Bathtub Faucet Diy Family Handyman

Bathroom Faucet Is Leaking Or Dripping

5 Reasons Your Faucet Is Dripping Water How To Fix It

How To Repair A Leaky Bathroom Faucet Stanley Tools

How To Fix A Leaky Faucet True Value

5 Reasons Your Faucet Is Dripping Water How To Fix It

How To Fix Delta Faucet Leaking From Handle

How To Fix A Leaky Bathroom Sink Faucet

5 Easy Steps To Repair A Leaky Shower Faucet Val Homelody
Related Posts