Essential Aspects of Bathroom Sink Drain Gasket Replacement
Maintaining a bathroom sink free of leaks and clogs requires careful attention to its components, including the drain gasket. Over time, this crucial seal can deteriorate due to wear and tear, leading to leaks and water damage.
Replacing a bathroom sink drain gasket is a relatively simple task that can save you both time and money in the long run. Here are the essential steps involved in this process:
1. Gather the Necessary Tools and Materials
- Pliers or an adjustable wrench
- Replacement drain gasket
- Plumber's putty or silicone sealant (optional)
- Rags or towels
2. Turn Off the Water Supply
Locate the shut-off valve under the sink and turn it off to prevent water from leaking during the replacement process.
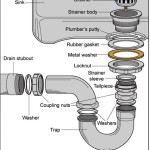
3. Remove the Drain Assembly
- Place a rag over the drain opening to catch any loose parts.
- Using pliers or a wrench, loosen the locknut that holds the drain assembly in place.
- Remove the drain assembly by carefully pulling it upwards.
4. Inspect the Drain Gasket
Once the drain assembly is removed, examine the old gasket. Look for cracks, tears, or other signs of damage.
5. Apply Plumber's Putty or Silicone Sealant (Optional)
To create a better seal, you can apply a thin layer of plumber's putty or silicone sealant around the base of the drain assembly before installing the new gasket.
6. Place the New Drain Gasket
Fit the replacement drain gasket over the drain hole. Make sure it is seated correctly and forms a tight seal.
7. Reinstall the Drain Assembly
- Align the drain assembly over the drain hole and carefully push it into place.
- Tighten the locknut using pliers or a wrench until it is snug but not overly tightened.
8. Turn on the Water Supply
Turn on the shut-off valve under the sink to restore water flow.
9. Test for Leaks
Run water into the sink and check for any leaks around the drain assembly. If there are any signs of leakage, tighten the locknut further or adjust the gasket.
Conclusion
Replacing a bathroom sink drain gasket is a straightforward task that can prevent costly leaks and damage. By following these steps, you can ensure a watertight seal and maintain the proper functioning of your bathroom sink.

Installing A New Bathroom Sink

How To Replace A Rusty Sink Drain Howtolou Com

Danco Rubber Tub Drain Gasket In Black 88209 The Home Depot

Replace Sink Strainer Gasket Diy Plumbing Kitchen Remodel Faucet Repair

New Bathroom Sink Drain Leaks At Threads

Vigo Vessel Bathroom Sink Pop Up Drain And Mounting Ring In Oil Rubbed Broe Vg07000rb The Home Depot

Installing A New Bathroom Sink

How To Fix Bathroom Sink Drain Leaks Underneath Gasket Threads Solved

How To Fix Or Replace A Leaky Sink Trap Hometips Drain Repair Replacing Kitchen

Oatey 1 2 In Sink Drain Pipe D Rubber Washer Pack Hdc7195c The Home Depot