Bathroom Sink Drain Schematic: Understanding the Plumbing Beneath
The bathroom sink, a seemingly simple fixture, hides a surprisingly intricate network of pipes and components that ensure efficient water drainage. Understanding the bathroom sink drain schematic is crucial for both homeowners and plumbers, providing insights into its functionality, potential issues, and maintenance requirements. This article delves into the key components of a typical bathroom sink drain system, outlining their roles and explaining how they work together.
1. The Drain Assembly
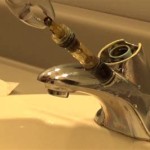
The heart of the bathroom sink drain system is the drain assembly, a collection of parts responsible for guiding water from the sink basin to the main drain line. The assembly typically includes the following components:
- Tailpiece: This short, threaded pipe connects the sink's drain opening to the P-trap and is often adjustable to accommodate different sink heights or configurations.
- P-trap: This essential component is a U-shaped pipe filled with water that forms a seal, preventing sewer gases from entering the house.
- Drain Pipe: This pipe connects the P-trap to the main drain line, typically extending through the wall or floor to the sewer system.
- Waste and Overflow Assembly: The overflow assembly consists of a drain hole in the sink basin that connects to the P-trap through a smaller pipe. This assembly prevents water from overflowing the sink if left running unattended.
- Stopper: The stopper seals the drain opening, allowing water to fill the sink basin. Different types of stoppers exist, ranging from simple push-down stoppers to more sophisticated pop-up stoppers with a lever mechanism.
2. The Drain Mechanism
The drain mechanism refers to the system that controls the flow of water through the drain assembly. This mechanism is crucial for regulating water levels in the sink and ensuring effective drainage.
- Push-Down Stoppers: These simple stoppers are often found in older sinks. They consist of a rubber or plastic disc that seals the drain opening when pressed down.
- Pop-Up Stoppers: These more common stoppers use a lever or rod connected to a lift rod that raises and lowers the stopper to control water flow.
- Overflow Mechanism: The overflow mechanism is a crucial safety feature that prevents water from overflowing the sink. When the water level reaches a certain point, the overflow hole opens, allowing excess water to drain into the P-trap.
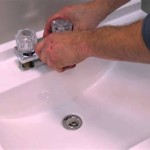
3. Maintenance and Troubleshooting
Understanding the bathroom sink drain schematic is essential for effective maintenance and troubleshooting. Common issues with bathroom sink drains often stem from blockages, leaks, or faulty components. Here are some key points to keep in mind:
- Preventing Clogs: Hair, soap scum, and other debris can accumulate in the drain, leading to clogs. Regularly cleaning the drain with a drain cleaner or removing hair with a drain snake can help prevent clogs.
- Identifying Leaks: Leaking faucets or pipes within the drain assembly can cause significant water damage. Identifying the source of the leak and repairing it promptly is essential.
- Replacing Faulty Components: If the drain mechanism is malfunctioning or a component is damaged, it may need to be replaced. This often requires professional assistance, as the components may need to be accessed through the wall or under the sink.

Bathroom Sink Plumbing Diagram Diy Sinks Drain Kitchen Remodel

20 Bathroom Sink Drain Parts How They Works Stopper Plumbing

Parts Of A Sink The Home Depot

Bathroom Sink Plumbing Diagram Drain

Bathroom Sink Pop Up Stopper Parts Diagram Drain Plug

How To Plumb A Bathroom With Multiple Plumbing Diagrams Hammerpedia

How To Fit A Bathroom Sink Diy Guides Victorian Plumbing

Parts Of A Sink The Home Depot

Sereve Valley Bathroom Sink Pop Up Drain Brass Material With Mounting Serene

Kitchen Sink Drain Parts Diagram Decorating Ideas On A Budget Check More At Http Www Entrop Bathroom Plumbing
Related Posts