Bathroom Sink Faucet Handle Repair: Essential Aspects
Maintaining a functional bathroom sink faucet handle is crucial for a seamless bathroom experience. When the handle malfunctions, it can disrupt water flow, temperature control, and the overall aesthetic of your bathroom. Understanding the essential aspects of bathroom sink faucet handle repair empowers homeowners to tackle common issues and ensure their faucets operate smoothly.
This article will delve into the critical elements of faucet handle repair, providing comprehensive guidance for DIY enthusiasts. By exploring these aspects, homeowners can gain the knowledge and confidence to resolve common handle issues, saving time, money, and professional assistance.
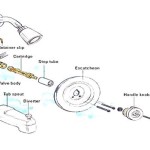
### Identifying the Type of HandleThe first step in faucet handle repair is identifying the type of handle. Common handle types include lever, knob, and cross handles. Each type has unique mechanisms and repair requirements. Lever handles move up and down, knobs turn clockwise or counterclockwise, and cross handles operate with a quarter-turn motion.
### Troubleshooting Common Handle ProblemsOnce the handle type is identified, homeowners can troubleshoot common problems. Loose handles, dripping faucets, and stiff or stuck handles are among the most frequent issues. Loose handles can be tightened with a wrench or screwdriver. Dripping faucets may require replacing the washer or cartridge. Stiff or stuck handles can be lubricated or may necessitate replacing the handle assembly.
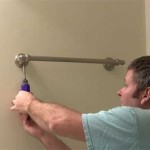
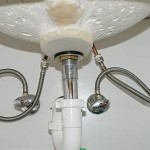
### Disassembling the HandleDepending on the issue, it may be necessary to disassemble the handle. This involves removing the handle cover, screws, and internal components. Careful attention should be paid to the order and orientation of parts for proper reassembly.
### Replacing Worn ComponentsWorn or damaged components, such as washers, cartridges, or handle assemblies, need to be replaced. These parts are typically easy to find at hardware stores or online retailers. Before replacing components, ensure they are compatible with the faucet model.
### Reassembling the HandleAfter replacing the worn components, the handle can be reassembled. Follow the disassembly steps in reverse, ensuring all parts are securely tightened. Check for any leaks or improper operation before putting the faucet back into service.
### ConclusionUnderstanding the essential aspects of bathroom sink faucet handle repair empowers homeowners to maintain their faucets efficiently. By identifying the type of handle, troubleshooting common problems, disassembling the handle, replacing worn components, and reassembling the handle, homeowners can avoid unnecessary expenses and keep their bathroom fixtures functioning smoothly.

How To Fix A Bathroom Faucet 14 Steps

How To Tighten A Bathroom Faucet Handle

How To Tighten Faucet Handle Homeserve Usa

Simple Ways To Fix A Leaky Delta Bathroom Sink Faucet

How Do I Replace Bathroom Sink Faucet Handles Cleaning More

How To Repair A Single Handle Kitchen Faucet Diy Family Handyman

Replacing A Bathroom Faucet Fine Homebuilding

How To Fix A Stripped Faucet Handle In 10 Minutes Or Less

Tighten A Loose Lever On Moen Brantford Faucet

4 Easy Ways To Fix A Leaky Bathroom Sink Faucet With Double Handle
Related Posts