Bathroom Sink Faucet Handle Replacement: A Step-by-Step Guide
A malfunctioning bathroom sink faucet handle can be a frustrating inconvenience, but replacing it yourself is a relatively straightforward task that can save you money and time. Here's a step-by-step guide to help you through the process:
Step 1: Gather Tools and Materials
Before you begin, gather the necessary tools and materials, including:
* Replacement faucet handle * Adjustable wrench * Phillips head screwdriver * Allen wrench (if applicable) * Plumber's greaseStep 2: Shut Off Water Supply
Turn off the water supply valves located beneath the sink. There should be two valves, one for hot water and one for cold water. Turn both valves clockwise until fully tightened.
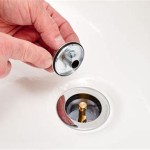
Step 3: Remove Old Handle
Use an adjustable wrench to loosen the retaining nut located underneath the handle. Once loosened, pull the handle straight up to detach it from the faucet stem.
Step 4: Remove Handle Cover (Optional)
Some handles have a separate cover that needs to be removed before you can detach the handle. If your handle has a cover, use a Phillips head screwdriver to remove the screws holding it in place.
Step 5: Remove Set Screw
Locate the set screw in the center of the faucet stem. Use an Allen wrench to loosen and remove the screw.
Step 6: Replace Faucet Stem (Optional)
If the faucet handle is still leaking after replacing the handle, you may need to replace the faucet stem. Use an adjustable wrench to loosen the packing nut, then pull out the old stem and insert the new stem.
Step 7: Install Replacement Handle
Align the replacement handle with the faucet stem and push down to secure it. Tighten the retaining nut using an adjustable wrench.
Step 8: Install Handle Cover (Optional)
If your handle has a separate cover, place it over the handle and secure it using the Phillips head screws.
Step 9: Apply Plumber's Grease
Apply a bead of plumber's grease to the base of the handle to lubricate it and prevent future leaks.
Step 10: Turn On Water Supply
Turn both water supply valves counterclockwise to turn the water back on. Check for any leaks around the handle and tighten the retaining nut as necessary.
Conclusion
Replacing a bathroom sink faucet handle is a simple and inexpensive repair that can restore functionality to your sink. By following these steps carefully, you can easily save yourself the cost of hiring a plumber and enjoy a leak-free sink for years to come.

How Do I Replace Bathroom Sink Faucet Handles Cleaning More

Replacement Kitchen Bathroom Sink Single Lever Mixer Tap Handle Faucet Knob Grip

Danco Replacement Lavatory Faucet Handles For American Standard In Chrome 10422 The Home Depot

Replacement Kitchen Bathroom Sink Single Lever Mixer Tap Handle Faucet Knob Grip

Replacing A Bathroom Faucet Fine Homebuilding

Diy How To Replace A Bathroom Sink Faucet Remove Install

How To Fix A Bathroom Faucet 14 Steps

Danco White Chrome Knob Bathroom Sink Faucet Handle In The Handles Department At Com

How To Change The Handle Rotation On A Faucet

How To Remove Moen Bathroom Faucet Handle In 2 Steps