Bathroom Sink Faucet Replacement Instructions
Replacing a bathroom sink faucet can be a daunting task for homeowners, especially those with limited plumbing experience. However, with the right tools, materials, and a step-by-step guide, this project can be accomplished successfully. This article provides a comprehensive overview of the bathroom sink faucet replacement process, outlining essential steps and considerations for a smooth and efficient installation.
1. Gathering Tools and Materials
Before embarking on the faucet replacement project, it is crucial to gather all necessary tools and materials. The following list provides a comprehensive overview of essential items:
- Adjustable wrench
- Channel-lock pliers
- Pipe wrench
- Phillips screwdriver
- Flathead screwdriver
- Plumber's tape (Teflon tape)
- New bathroom sink faucet
- Replacement supply lines (if required)
- Basin wrench
- Bucket or container for catching water
- Gloves (optional)
- Safety glasses (optional)
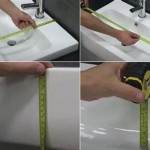
It is essential to ensure that the new faucet is compatible with existing plumbing fixtures, such as the sink drain and supply line connections. If any adaptations are required, consider sourcing appropriate fittings and adapters to ensure a seamless installation.
2. Shutting Off Water Supply and Draining the System
Before disassembling the existing faucet, it is crucial to shut off the water supply to the sink. This is typically accomplished by turning the shut-off valves located beneath the sink. If the valves are old or corroded, they may require additional force or a specialized wrench to operate. Once the water supply is shut off, open the faucet to drain any remaining water in the system. It is advisable to place a bucket or drain pan beneath the faucet to catch any drips.
Once the water supply is shut off and the system is drained, it is important to double-check that the faucet lever or handles are in the off position.
3. Disassembling the Existing Faucet
With the water supply shut off and the system drained, dismantling the existing faucet can begin. The process typically involves the following steps:
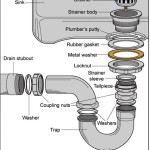
- Locate the faucet's mounting nuts, usually situated beneath the sink. These nuts secure the faucet to the sink deck.
- Using adjustable wrenches or channel-lock pliers, loosen the mounting nuts, working from the back of the faucet. Be careful not to overtighten the nuts, as this could damage the sink.
- Once the mounting nuts are loosened, carefully lift the faucet assembly from the sink. As the faucet is removed, disconnect the supply lines, noting their orientation.
- Disconnect the drain stopper or pop-up assembly from the faucet spout, taking care not to lose any small parts.
After removing the existing faucet, inspect the mounting holes and surrounding areas for any debris or corrosion that may interfere with the new faucet's installation.
4. Installing the New Faucet
With the existing faucet removed, installing the new faucet can proceed. This process typically involves the following steps:
- Clean the mounting holes and surrounding areas thoroughly to ensure a secure and stable installation.
- Attach the new faucet's supply lines to the hot and cold water inlets. Ensure that the lines are properly connected and secured with appropriate fittings or adapters.
- Position the new faucet over the mounting holes, aligning the faucet with the sink deck and aligning the supply lines with the water inlets.
- Secure the faucet in place by tightening the mounting nuts from the underside of the sink. Avoid overtightening the nuts, as this could damage the sink or faucet.
- Attach the drain stopper or pop-up assembly to the faucet spout, ensuring that all parts are correctly aligned and secured.
Once the new faucet is installed, it is essential to test the faucet's functionality and verify that there are no leaks. If any leaks are detected, tighten the mounting nuts and supply line connections further, ensuring that all connections are properly sealed.
5. Turning On the Water Supply and Testing for Leaks
With the new faucet installed, carefully turn the water supply back on. Initially, operate the faucet slowly, checking for leaks at all connections. It is advisable to allow the faucet to run for a few minutes to ensure that all air is purged from the system.
If any leaks are detected, turn off the water supply and re-tighten the appropriate connections. Double-check that all connections are properly secured, and repeat the testing process.
6. Cleaning Up and Final Adjustments
After completing the installation process and verifying that there are no leaks, clean up the workspace and dispose of any debris or packaging materials. Final adjustments to the faucet handles or lever can be made to ensure proper operation and comfort. It is essential to refer to the manufacturer's instructions for specific adjustments or settings.
Congratulations on successfully replacing your bathroom sink faucet! Regularly maintain the faucet by cleaning it with mild soap and water, avoiding abrasive cleaners that could damage the finish.

Diy How To Replace A Bathroom Sink Faucet Remove Install

How To Replace A Bathroom Faucet Home Repair Tutor

Replacing A Bathroom Faucet Fine Homebuilding

Installation Instructions For Bathselect Crimea Antique Brass Dual Handled Bathroom Sink Faucet

How To Remove And Install A Bathroom Faucet

How To Remove And Install A Bathroom Faucet

Step By Tutorial How To Install A New Bathroom Sink Faucet Maggie Mcgaugh

How Do I Replace Bathroom Sink Faucet Handles Cleaning More

How To Remove And Install A Bathroom Faucet

How To Replace A Bathroom Faucet Home Repair Tutor
Related Posts