Bathroom Sink Hose Replacement: A Step-by-Step Guide
If you're experiencing leaks, clogs, or other problems with your bathroom sink hose, it may be time for a replacement. Replacing a bathroom sink hose is a relatively simple task that can be completed in a few steps. In this article, we'll provide you with a step-by-step guide to help you replace your bathroom sink hose quickly and easily.
Tools and Materials Needed
Before you begin, you'll need to gather the following tools and materials:
- New bathroom sink hose
- Adjustable wrench
- Channellock pliers
- Bucket or basin
- Old towels or rags
- Flashlight (optional)
Step 1: Turn off the Water Supply
The first step is to turn off the water supply to your bathroom sink. You can usually do this by turning the valve located under the sink or by turning off the main water supply to your home.
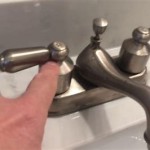
Step 2: Disconnect the Old Hose
Once the water supply is turned off, you can disconnect the old hose. Use your adjustable wrench to loosen the nuts that hold the hose in place. Be careful not to drop the nuts down the drain.
Step 3: Inspect the Faucet and Drain Assembly
While the old hose is disconnected, take a moment to inspect the faucet and drain assembly for any signs of damage or corrosion. If you notice any problems, you may need to replace the faucet or drain assembly as well.
Step 4: Install the New Hose
Now it's time to install the new hose. Start by threading the new hose onto the faucet. Hand-tighten the nuts until they are snug. Then, use your adjustable wrench to tighten the nuts further. Be careful not to overtighten the nuts, as this could damage the hose.
Step 5: Reconnect the Water Supply
Once the new hose is installed, you can reconnect the water supply. Turn the valve under the sink or the main water supply to your home back on. Check for leaks around the hose connections. If you notice any leaks, tighten the nuts further until the leak stops.
Step 6: Turn on the Water and Test the Hose
Finally, turn on the water at the sink and check for leaks. If you notice any leaks, tighten the nuts on the hose connections until the leak stops. You may also want to run the water for a few minutes to make sure that the hose is working properly.
Conclusion
Replacing a bathroom sink hose is a relatively simple task that can be completed in a few steps. By following the instructions in this article, you can easily replace your old hose and get your sink working properly again.

Moen 114299 Widespread Bathroom Sink Faucet Replacement Hose Kit With Duralock Connections Com

Replace Old Bathroom Water Supply Lines Without Leaks By Home Repair Tutor

Hose Assembly Pull Out Rp44647 Delta Faucet

Replacement Hose For Sink Kitchen Faucet With Pull Out Shower 1500 Mm Com

Spa Beauty Salon Shampoo Bowl Sink Hair Bath Accessories Bathroom Hot Cold Faucet Spray Hose Replacement Set China Shower Made In Com

1 5m Faucet Flexible Pull Out Spray Tap Hose Replace For Kitchen Basin Bathroom

Elastic Plastic Flexible Kitchen Bathroom Sink Extension Drain Hose Pipe Replace

Replacement Hose For Sink Kitchen Faucet With Pull Out Shower 1500 Mm Com

Replacement Hose For Sink Kitchen Faucet With Pull Out Shower 1500 Mm Com
Related Posts