Bathroom Sink Installation: A Comprehensive Guide to Essential Aspects
Upgrading or replacing a bathroom sink can enhance the functionality and aesthetics of your space. To ensure a successful installation, it's crucial to understand the essential aspects involved. Here's a comprehensive guide to guide you through the process:
Sink Selection:
Choosing the right bathroom sink is paramount. Consider factors such as size, shape, material, and style to align with your bathroom's design and dimensions. Popular materials include ceramic, porcelain, and granite, each offering unique properties. It's also important to select a sink compatible with your faucet and countertop.
Tools and Materials:
Before beginning installation, gather the necessary tools and materials: a basin wrench, adjustable wrench, pliers, putty knife, level, caulk gun, plumbers putty, and mounting hardware. The specific tools may vary depending on the sink type you choose.
Sink Removal (if applicable):
If you're replacing an existing sink, it must be removed first. Disconnect the water supply lines, unscrew the drain, and detach the faucet. Use a putty knife to remove old putty or caulk. Carefully lift the old sink and discard it.
Sink Preparation:
Before installing the new sink, apply a bead of silicone or plumbers putty to the underside of the rim. This will create a watertight seal between the sink and countertop. Position the sink onto the countertop and gently press down to secure it in place.
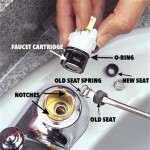
Drain and Faucet Installation:
Assemble the drainpipe and connect it to the sink's drain hole. Tighten the drain assembly using the basin wrench. Next, install the faucet by following the manufacturer's instructions. Use a plumber's putty to seal any gaps around the faucet base.
Water Line Connection:
Reconnect the water supply lines to the faucet. Ensure the connections are secure and hand-tighten them. If necessary, use a wrench to further tighten the connections.
Caulking and Finishing:
To prevent water damage, apply a bead of caulk around the edges of the sink where it meets the countertop. Use a damp cloth or your finger to smooth out the caulk. Let the caulk dry completely before using the sink.
Testing and Maintenance:
Turn on the water supply and check for any leaks. If you notice leaks, tighten the connections or apply additional caulk. Regular cleaning and maintenance will extend the lifespan of your bathroom sink. Use a mild cleaning solution and avoid abrasive agents that can damage the finish.

How To Install A Bathroom Sink Step By Guide

How To Fit A Bathroom Sink Diy Guides Victorian Plumbing

How To Install A Bathroom Vanity And Sink

Here S How Install A Bathroom Pedestal Sink

How To Replace And Install A Bathroom Sink

How To Install A Bathroom Sink Taskrabbit Blog

Bathroom Sink Plumbing Installation Diy Montreal

How To Replace And Install A Bathroom Sink

How To Install A Bathroom Sink Hooking Up Drain

How To Install Or Remove A Bathroom Vanity Homeserve Usa
Related Posts