Essential Aspects of Bathroom Sink Piping Diagram
A bathroom sink piping diagram is a crucial tool for understanding the layout and connections of the pipes that supply water to and drain wastewater from a bathroom sink. It provides a visual representation of the plumbing system, enabling plumbers and homeowners to troubleshoot problems, plan renovations, and ensure the proper functioning of the sink.
Understanding the essential aspects of a bathroom sink piping diagram is key for effective plumbing maintenance and repairs. This article will delve into the different components, symbols, and important considerations of a piping diagram.
Components of a Bathroom Sink Piping Diagram
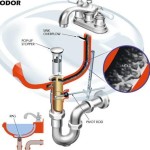
A typical bathroom sink piping diagram includes the following components:
- Supply lines: Pipes that bring cold and hot water to the faucet.
- Faucet: The fixture that controls the flow of water.
- Drainpipe: The pipe that carries wastewater away from the sink.
- P-trap: A U-shaped section of pipe that traps water to prevent sewer gases from entering the room.
- Vent stack: A vertical pipe that allows air to enter the drainage system, preventing clogs.
Symbols in a Bathroom Sink Piping Diagram
Piping diagrams use symbols to represent different components and connections. Common symbols include:
- Lines: Pipes are represented by solid or dashed lines, depending on their size and type.
- Arrows: Arrows indicate the direction of water flow.
- Circles: Circles represent fixtures or appliances, such as the faucet or drain.
- Squares: Squares represent valves or other control devices.
- Ellipses: Ellipses represent bends or changes in pipe direction.
Important Considerations When Reading a Piping Diagram
When reading a bathroom sink piping diagram, consider the following factors:
- Scale: Ensure the diagram is drawn to scale to accurately represent the dimensions of the piping system.
- Materials: Different pipes are made from various materials such as copper, PVC, or PEX. Check the legend to identify the materials used.
- Slopes: Drainpipes must have a slight slope to allow water to drain properly. Check the diagram for proper slopes.
- Connections: Ensure all connections are properly made and sealed to prevent leaks.
- Access: Consider the accessibility of pipes for maintenance or repairs.
Conclusion
A bathroom sink piping diagram is an essential tool for understanding and maintaining the plumbing system in a bathroom. By familiarizing yourself with the components, symbols, and important considerations described above, you can effectively troubleshoot problems, plan renovations, and ensure the proper functionality of your bathroom sink.

Bathroom Sink Plumbing Diagram Diy Sinks Drain

Bathroom Sink Plumbing

How To Plumb A Bathroom With Multiple Plumbing Diagrams Hammerpedia

20 Bathroom Sink Drain Parts How They Works Stopper Plumbing

Gallery Of Bathrooms Basics 6 Tips To Plan Your Bathroom Plumbing And Layout 11

How To Fit A Bathroom Sink Diy Guides Victorian Plumbing

Bathroom Sink Drain Parts Diagram Http Www Designbabylon Interiors Com P Plumbing Kitchen

How To Easily Connect The Plumbing For A New Bathroom Sink Hometips

Bathroom Sink Pop Up Stopper Parts Diagram Drain Plug

Bathroom Sink Parts Diagram Plumbing Drain
Related Posts