Bathroom Sink Push Plug Replacement: A Comprehensive Guide
A malfunctioning bathroom sink push plug can lead to annoying water pooling and drainage issues. Replacing a push plug is a relatively simple task that homeowners can tackle themselves with the right tools and instructions. In this comprehensive guide, we will delve into the essential steps of bathroom sink push plug replacement.
Materials Required
Before starting the replacement process, gather the following materials:
* New bathroom sink push plug * Adjustable wrench or pliers * Basin wrench (optional) * Rags or towels * Anti-seize lubricantStep-by-Step Instructions
1. Turn off Water Supply:Locate the shutoff valves under the sink and turn off the water supply to the bathroom sink.
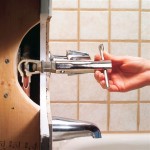
2. Remove Old Push Plug:Place a rag around the base of the push plug to protect the sink and prevent the plug from falling into the drain. Using an adjustable wrench or pliers, gently rotate the push plug counterclockwise until it loosens and comes free.
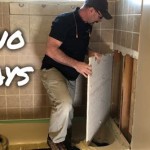
3. Inspect and Clean:Inspect the old push plug and the drain opening for any damage or debris. Use a rag or brush to remove any dirt or grime that may have accumulated.
4. Apply Anti-Seize Lubricant:Apply a thin layer of anti-seize lubricant to the threads of the new push plug. This will prevent corrosion and make future removal easier.
5. Install New Push Plug:Carefully insert the new push plug into the drain opening and tighten it by rotating it clockwise. Use an adjustable wrench or pliers for a secure fit. Avoid overtightening, as this could damage the plug or the drain.
6. Test Fit and Adjust:Once installed, turn on the water supply and check for any leaks. If there are any, adjust the tightness of the push plug accordingly using the basin wrench.
Additional Tips
* Choose a new push plug that is compatible with your sink drain. * Use a basin wrench for a tighter fit and easier installation. * If you encounter any difficulties during the replacement process, seek assistance from a qualified plumber. * Regularly inspect and clean the push plug to prevent future issues.Conclusion
Replacing a bathroom sink push plug is a straightforward task that can be completed with minimal effort and the right tools. By following these instructions carefully, you can restore the functionality of your sink and prevent water leakage problems.

40mm Heavy Chrome Plated Basin Sink Waste Pop Up Plug Replacement Brass Metal Diy At B Q

Pop Up Sink Plugs With Strainer For Bathroom Universal Plug Replacement Fits 28 5mm 38 5

Universal Sink Plug 40mm Pop Up Replacement Drain Height Adjustable Made Of Brass Rubber Plastic Rust Proof And Gasket For Bathroom Home Sinks Bidets

Basin Pop Up Plug Lime Kitchen Bathroom

Bathroom Sink Drain Plug Stopper Pop Up Water Bathtub Replacement Press Type For Home Accessories Temu

40mm Bathroom Sink Plug Pop Up Waste Basin Push On Slotted Chrome Plated

Replacement Pop Up Waste Plug With Flat Seal Adjustable Bath Basin Sink Bathroom

Bathroom Sink Plug Replacement

How To Get A Bathroom Sink Plug Removed When It Won T Un Quora

How To Fix Or Maintain Your Sink S Pop Up Mechanism