Understanding the Essential Aspects of Bathroom Sink Rough In Plumbing Diagram
A bathroom sink rough-in plumbing diagram provides a detailed blueprint for the placement and connections of plumbing fixtures and pipes behind the bathroom sink. Understanding this diagram is crucial during bathroom renovations or new construction, ensuring a functional and code-compliant installation.
Essential Elements of the Diagram
The rough-in diagram typically includes the following elements:
- Drain Position: Indicates the center of the sink drain hole and its distance from the wall.
- Supply Lines: Shows the locations and sizes of the hot and cold water supply pipes that will connect to the faucet.
- P-Trap: Denotes the location of the P-trap, a U-shaped pipe that prevents sewer gases from entering the bathroom.
- Vent Stack: Illustrates the connection to the vent stack, which allows gases to escape from the drain system.
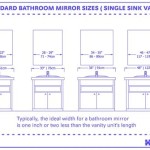
- Countertop Material: Specifies the thickness of the countertop to determine the height of the sink flange.
Benefits of Using the Rough-In Diagram
Referencing the rough-in diagram during sink installation offers several advantages:
- Accuracy: Ensures precise placement of fixtures and pipes, avoiding costly mistakes and rework.
- Code Compliance: Guarantees that the installation adheres to local plumbing codes and building regulations.
- Efficient Time Management: Reduces guesswork and streamlines the installation process, saving time.
- Reduced Leaks: Proper pipe alignment and distance calculations minimize the risk of leaks.
- Warranty Protection: Adhering to the manufacturer's rough-in specifications can uphold fixture warranties.
Tips for Interpreting the Diagram
To effectively interpret the rough-in diagram:
- Measure Accurately: Use a tape measure to confirm the dimensions and distances indicated on the diagram.
- Consult with Professionals: If you encounter any uncertainties, seek guidance from a licensed plumber or contractor.
- Mark the Floor: Transfer the measurements from the diagram to the bathroom floor before beginning any work.
- Consider Countertop Thickness: Adjust the drain height based on the countertop material and thickness.
Remember, following the bathroom sink rough-in plumbing diagram ensures a successful and hassle-free sink installation. By understanding the essential elements, utilizing its benefits, and interpreting it accurately, you can achieve a functional, code-compliant, and aesthetically pleasing bathroom.

How To Plumb A Bathroom With Multiple Plumbing Diagrams Hammerpedia

Plumbing Diagram Bathroom Shower

Bathroom Plumbing Rough In Dimensions Astonishing Toilet Sink Drain

This Image To Show The Full Size Version Bathroom Plumbing Sink Shower

Pin On Diagram

A Vessel Sink Conversion Fine Homebuilding

Kitchen Sink Plumbing Rough In Dimensions Wow Blog Bathroom

What Does A Bathroom Plumbing Diagram For Rough In Look Like Quora

Kitchen Sink Plumbing Rough In Diagram Bathroom Drain

Kitchen Sink Plumbing Rough In Diagram Diy Bathroom
Related Posts