Essential Aspects of Bathroom Sink Waste Fitting Instructions
Replacing a bathroom sink waste fitting may seem like a daunting task, but it's actually a straightforward process that can be completed in a relatively short amount of time with the right tools and materials. Here are the essential aspects to consider when fitting a new bathroom sink waste:
Tools and Materials Needed:
- Adjustable wrench
- Channel-lock pliers
- Plumber's putty
- Teflon tape
- New waste fitting
- Basin wrench (optional)
Step 1: Remove the Existing Waste Fitting
Place a bucket or bowl under the sink to catch any water. Use an adjustable wrench to loosen the locknut that connects the waste fitting to the sink. Once the locknut is loose, use channel-lock pliers to carefully remove the waste fitting.
Step 2: Clean the Sink
Use a damp cloth to clean the surface of the sink where the new waste fitting will be installed. Remove any old sealant or debris.
Step 3: Apply Plumber's Putty
Roll out a small amount of plumber's putty into a rope and place it around the base of the new waste fitting. The plumber's putty will create a watertight seal between the waste fitting and the sink.
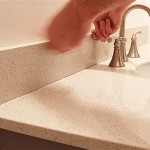
Step 4: Install the New Waste Fitting
Insert the new waste fitting into the sink opening and hand-tighten it. Use the adjustable wrench to further tighten the locknut until it is secure, but avoid overtightening. Ensure the waste fitting is level and centered.
Step 5: Attach the Waste Plug
Insert the waste plug into the waste fitting and hand-tighten it. If necessary, you can use a basin wrench to further tighten the plug.
Step 6: Connect the Trap
Attach the trap to the waste fitting using the provided nuts and bolts. Tighten the connections securely.
Step 7: Test for Leaks
Turn on the water supply and check for any leaks around the waste fitting and trap. If you notice any leaks, tighten the connections further. Wipe away any excess water.
Additional Tips:
- Use Teflon tape on all threaded connections to prevent leaks.
- If the waste fitting is leaking from the top, it is likely that the plumber's putty was not applied correctly or the waste fitting is not properly tightened.
- If the waste fitting is leaking from the bottom, it is likely that the trap is not properly connected or the waste plug is not tightened securely.
- If you are not comfortable performing the installation yourself, it is advisable to hire a licensed plumber.
By following these instructions carefully, you can successfully replace a bathroom sink waste fitting and ensure a leak-free installation.

How To Fit A Bathroom Sink Diy Guides Victorian Plumbing

How To Fit A Bathroom Sink Diy Guides Victorian Plumbing

How To Install A Waste Fitting Basin

Basin Waste Seal Kit Bathroom Accessories Tyde

Basin Mate Waste Seal Kit 3 Part

How To Fit A Basin Waste In 5 Steps Victorian Plumbing

How To Change A Basin Waste Plumbing Tips Basics

How To Replace And Install A Bathroom Sink

Simple Ways To Fit A Sink Waste Pipe With Pictures Wikihow

How To Fit A Bathroom Basin Bottle Trap From