Can't Remove Bathroom Sink Pipes? Here's How to Solve the Problem
Removing bathroom sink pipes can be a daunting task, especially if they're stuck or corroded. But with the right tools and techniques, it's entirely possible to tackle this DIY project yourself. Here's a comprehensive guide to help you safely and effectively remove bathroom sink pipes:
Step 1: Gather Your Tools
To remove bathroom sink pipes, you'll need the following tools:
* Adjustable wrench * Basin wrench * Plumber's putty knife * Bucket or bowl * Rags or paper towelsStep 2: Safety First
Before you start working, turn off the water supply to the sink. Then, open the faucet to release any remaining water in the pipes. Place a bucket or bowl under the sink to catch any water that might leak out.
Step 3: Remove the Drain Stopper and Pop-Up Assembly
If your sink has a drain stopper, remove it by unscrewing the small screw at the bottom of the stopper. Some sinks may have a pop-up assembly instead. To remove a pop-up assembly, use a pair of pliers to gently squeeze the release lever under the sink and lift the assembly up.
Step 4: Disconnect the Supply Lines
Locate the water supply lines connected to the bottom of the sink. Use an adjustable wrench to loosen the nuts that connect the supply lines to the faucet and the shut-off valves. Be careful not to overtighten the wrench.
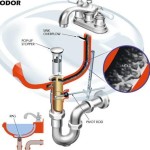
Step 5: Remove the Sink Trap
The sink trap is the curved pipe that connects the sink drain to the drainpipe. To remove the trap, place a basin wrench on the nuts at both ends of the trap and twist them counterclockwise to loosen them. Carefully remove the trap and discard any debris that may have accumulated inside.
Step 6: Loosen the Sink Nuts
Underneath the sink, you'll find several nuts that hold the sink in place. Use an adjustable wrench to loosen these nuts but do not remove them completely. Gently tap the nuts with a hammer to break any corrosion that may be holding them in place.
Step 7: Remove the Sink
Once the nuts are loose, you can carefully lift the sink up and away from the countertop. Be careful not to damage the countertop or the sink during this process.
Step 8: Clean and Inspect the Pipes
Once the sink is removed, you can inspect the pipes for any leaks or damage. Use a plumber's putty knife to remove any old putty or sealant from the pipes and the drain opening.
Step 9: Install the New Pipes
If the old pipes need to be replaced, use Teflon tape to wrap around the threads of the new pipes and hand-tighten them into place. Use a wrench to further tighten the pipes, but avoid overtightening.
Step 10: Reinstall the Sink
Carefully place the sink back in place and tighten the nuts underneath the sink to secure it. Ensure the sink is level and properly sealed.
Step 11: Reconnect the Drain and Supply Lines
Reconnect the drain trap, pop-up assembly, and supply lines in reverse order. Use Teflon tape on the threads of all connections and tighten them with a wrench.
Step 12: Turn on the Water Supply
Once everything is reconnected, slowly turn on the water supply and check for any leaks. If there are any leaks, tighten the connections until they stop.
Conclusion
Removing bathroom sink pipes can be a challenging task, but by following these steps and taking proper precautions, you can successfully complete this DIY project. Remember to always prioritize safety and use the right tools for the job.

How To Unclog A Bathroom Sink Hana S Happy Home

How To Get A Bathroom Sink Plug Removed When It Won T Un Quora

6 Ways To Fix Clogged Drains Keep Pipes Flowing Freely Horizon Services

How To Get A Bathroom Sink Plug Removed When It Won T Un Quora

How To Replace A Sink Stopper Quick And Simple Home Repair

Bianchina Swapping Out A Bathroom Sink Drain And Pop Up

How To Clear A Clogged Drain Reviews By Wirecutter

How Often Should I Clean My Drains At Home

How Do I Remove Buildup From Drain Pipes

How To Fix A Bathroom Sink That Won T Drain Bfp Bay Area
Related Posts