Essential Aspects of Changing Bathroom Basin Taps
Changing bathroom basin taps is an essential task that requires careful consideration of several factors. Understanding these aspects is crucial to ensure a successful and efficient installation.
Step 1: Preparation Gather all necessary tools, including an adjustable wrench, basin wrench, pliers, and Teflon tape. Turn off the water supply and drain the tap.
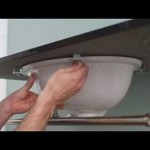
Step 2: Removing Existing Tap Use the adjustable wrench to loosen the nuts that hold the tap in place. Pull the tap straight up to remove it.
Step 3: Installing New Tap Apply Teflon tape to the threads of the new tap. Insert the tap into the basin and hand-tighten the nuts.
Step 4: Tightening Connections Use the adjustable wrench to tighten the nuts securely. Avoid overtightening as this can damage the tap or the basin.
Step 5: Reconnecting Water Supply Turn on the water supply and check for leaks. Tighten any loose connections if necessary.
Step 6: Finishing Touches Use pliers to tighten the handles, if applicable. Wipe the tap and basin to remove any debris or water spots.

How To Easily Replace Basin Taps Step By

How To Install Basin Taps Replacing A Bathroom Sink Tap

How To Change Bathroom Taps Everything You Need Know

How To Replace Bathroom Taps Big

4 Mistakes Changing Basin Taps

How To Replace A Basin Tap Big Bathroom

A Guide To Changing Kitchen And Bathroom Taps

Replacing Bathroom Sink Taps A Step By Guide

How To Replace A Lever Tap

How To Remove Change A Bath Tap Properly By Mira Showers
Related Posts