Essential Aspects of Changing Bathroom Mixer Tap Cartridge
Changing a bathroom mixer tap cartridge is a common plumbing task that typically requires replacing the worn-out or malfunctioning cartridge inside the tap. Understanding the essential aspects of this task is crucial to ensure a successful and trouble-free installation. This article delves into the key considerations for changing a bathroom mixer tap cartridge, providing a comprehensive guide to help you tackle this plumbing project with confidence.
Identifying the Cartridge Type
The first step in changing a bathroom mixer tap cartridge is identifying the type of cartridge installed. Different taps utilize various cartridge designs, including ceramic disc, quarter-turn, and dual lever cartridges. Correctly identifying the cartridge type is essential for selecting the appropriate replacement and ensuring a proper fit.
Gathering the Necessary Tools
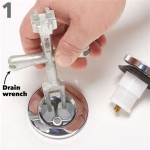
Before starting the replacement process, gather the necessary tools: an adjustable spanner or basin wrench, a flat-head screwdriver, and a cartridge puller (if required). Having the right tools on hand will streamline the task and prevent unnecessary delays or damage to the tap.
Accessing the Cartridge
Access the cartridge by removing the tap handle. The handle may be secured by a small screw or cap that needs to be unscrewed. Once the handle is removed, use the adjustable spanner to loosen the cartridge retaining nut located beneath the handle. Do not overtighten the nut to avoid damaging the cartridge.
Extracting the Cartridge
Depending on the cartridge design, you may need to use a cartridge puller to extract it from the tap body. Carefully insert the puller into the cartridge and turn it counterclockwise to release the cartridge. If a cartridge puller is not available, you can use a flat-head screwdriver to gently pry the cartridge loose.
Installing the New Cartridge
Before inserting the new cartridge, ensure that the o-rings or seals are properly lubricated with silicone grease. Align the cartridge with the tap body and carefully push it into place. Use the adjustable spanner to tighten the retaining nut, but avoid overtightening. Reattach the tap handle and test the cartridge by turning the tap on and off.
Conclusion
Changing a bathroom mixer tap cartridge is a straightforward task that can be completed with the right tools and by following the essential aspects outlined in this article. Identifying the cartridge type, gathering the necessary tools, accessing the cartridge, extracting the old cartridge, and installing the new one are all crucial steps that should be carefully followed. By considering these essential aspects, you can ensure a successful and trouble-free bathroom mixer tap cartridge replacement.

Replacing A Cartridge In Mixer Tap The

Replacing A Cartridge In Mixer Tap The

How To Change A Mixer Tap Cartridge The Sink Warehouse

How To Change A Single Lever Basin Cartridge

Tap Cartridge Replacement Guide Step By

How To Replace A Mixer Cartridge Diy Plumbing Guide Fix Tap

How To Replace Your Tap Valve In Kitchen Or Bathroom

How To Replace The Cartridge In A Mixer Tap

How To Replace A Mixer Cartridge Diy Plumbing Guide Fix Tap

Installation Guide Change A Basin Mixer Cartridge Grohe
Related Posts