Delta Bathroom Faucet Leaking at Base: Essential Troubleshooting Aspects
A leaking bathroom faucet can be a frustrating and wasteful problem. While some leaks are simple to fix, others may require the attention of a professional plumber. This article will focus on the essential aspects of troubleshooting and resolving a Delta bathroom faucet leaking at its base.
Before beginning the troubleshooting process, it is essential to determine the part of speech of the keyword "Delta Bathroom Faucet Leaking at Base." The keyword is a noun phrase that describes the faucet, its location, and the problem it exhibits. Understanding the part of speech will help us delve into the critical aspects of the topic effectively.
1. Identify the Source of the Leak
The first step in resolving a faucet leak is to identify the source of the problem. For a Delta bathroom faucet leaking at its base, there are several potential sources:
- Defective O-rings or washers
- Loose or damaged cartridge
- Cracked or worn-out valve seat
- Improper installation
2. Gather Necessary Tools and Replacement Parts
Once the source of the leak has been identified, the necessary tools and replacement parts can be gathered. These may include:
- Adjustable wrench
- Phillips head screwdriver
- Replacement O-rings or washers
- Replacement cartridge (if necessary)
3. Shut Off Water Supply
Before attempting any repairs, the water supply to the faucet must be shut off. Locate the shut-off valves beneath the sink and turn them clockwise to close them.
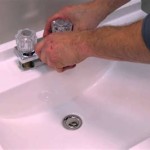
4. Disassemble the Faucet
Depending on the type of Delta bathroom faucet, the disassembly process may vary. Refer to the manufacturer's instructions for specific steps. Generally, the following steps are involved:
- Remove the aerator
- Unscrew the handle
- Remove the cartridge or valve seat
5. Replace Defective Parts
Once the faucet has been disassembled, the defective parts can be replaced. Ensure that the replacement parts are compatible with the specific Delta bathroom faucet model.
6. Reassemble the Faucet
Once the defective parts have been replaced, the faucet can be reassembled in reverse order. Tighten all connections securely, but avoid overtightening.
7. Turn On Water Supply and Check for Leaks
After reassembling the faucet, turn on the water supply and check for leaks. If the leak persists, further troubleshooting may be necessary, or professional assistance may be required.
Troubleshooting and resolving a Delta bathroom faucet leaking at its base can be a simple task with the right tools, replacement parts, and a systematic approach. By following these steps, you can restore your faucet to proper working order, prevent further water damage, and save money on water bills.

Simple Ways To Fix A Leaky Delta Bathroom Sink Faucet

How To Fix Delta Faucet Leaking From Handle

How To Fix Leaky Bathroom Handle Delta Faucet Model 4530 Series Hard Water

Simple Ways To Fix A Leaky Delta Bathroom Sink Faucet

How To Fix A Leaky Delta Two Handle Faucet

Simple Ways To Fix A Leaky Delta Bathroom Sink Faucet

Faucet Leaking At Base Of Spout Irv2 Forums

How To Repair A Leaky Delta Faucet

Leaks Service Parts Faq Delta Faucet

Gooseneck Faucet Leaking Around Base Easy Fix
Related Posts