Delta Bathroom Faucet Repair: A Comprehensive Guide
Delta bathroom faucets are known for their durability and style, but even the best fixtures can occasionally need repairs. Whether you're dealing with a leaky faucet, a faulty handle, or a clogged aerator, it's important to address the issue promptly to prevent further damage or inconvenience.
Tools and Materials Required
- Adjustable wrench
- Philips and flathead screwdrivers
- Allen wrench (if applicable)
- Replacement parts (if needed)
- Plumber's tape
Locating the Source of the Problem
Before you begin any repairs, it's essential to identify the source of the problem. Here are some common symptoms and their potential causes:
- Leaking faucet: Worn-out washers, loose connections, or damaged O-rings.
- Faulty handle: Loose screws, worn-out cartridges, or corroded components.
- Clogged aerator: Mineral deposits or debris buildup.
Step-by-Step Repair Instructions
Once you've identified the problem, follow these step-by-step instructions to repair your Delta bathroom faucet:
1. Shut Off the Water Supply
Locate the shut-off valves under the sink and turn them off to prevent water from flowing through the faucet.
2. Remove the Handle
Use a Phillips or flathead screwdriver to remove the screws securing the handle to the faucet body. Pull the handle straight up to remove it.
3. Replace a Leaking Cartridge
If the faucet is leaking, you may need to replace the cartridge. Unscrew the cartridge with an Allen wrench or adjustable wrench and pull it out. Insert a new cartridge and tighten it into place.
4. Replace Worn-Out Washers
Leaking washers can be replaced by hand. Use your fingers or a pair of pliers to gently remove the old washers and insert new ones. Make sure the new washers are the correct size.
5. Tighten Loose Connections
If the faucet is loose, use an adjustable wrench to tighten the connections. Be careful not to overtighten, as this could damage the faucet.
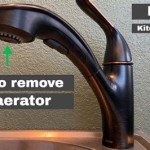
6. Clean the Aerator
To unclog the aerator, unscrew it from the faucet and soak it in vinegar or a cleaning solution. Use a small brush to gently remove any debris.
7. Apply Plumber's Tape
Before reassembling the faucet, wrap plumber's tape around the threaded connections to create a watertight seal.
8. Reassemble the Faucet
Reverse the disassembly steps to reassemble the faucet. Tighten all screws and connections securely.
9. Turn On the Water Supply
Once the faucet is reassembled, turn on the water supply and check for leaks. Adjust any loose connections as necessary.
Troubleshooting Tips
- If the faucet continues to leak after repair: Check for any damaged O-rings or cracked parts and replace them as needed.
- If the handle is still loose: Check the screws and ensure they are tightened securely.
- If the aerator becomes clogged again quickly: The source of the debris may be from the pipes. Consider calling a plumber for professional cleaning.
Conclusion
With the right tools and a bit of patience, repairing a Delta bathroom faucet is a straightforward task. By following these step-by-step instructions and troubleshooting tips, you can restore your faucet to its optimal condition.

Repair Parts For One And Two Handle Delta Bathroom Faucets

Repair Kit Bathroom Rp77739 Delta Faucet

Repair Parts For One And Two Handle Delta Bathroom Faucets

Delta Bathroom Faucet Repair Seats And Springs Serramar Hoa

Delta Faucet Repair Kit Rp44123 The Home Depot

Simple Ways To Fix A Leaky Delta Bathroom Sink Faucet

How To Fix A Leaky Delta Style Bathroom Faucet

Danco Metal Faucet Repair Kit Delta Delex In The Kits Components Department At Com

Repair Kit 1h Knob Or Lever Rp3614 Delta Faucet

Delta Foundations 4 In Centerset Single Handle Bathroom Faucet With Metal Drain Assembly Chrome B512lf The Home Depot