Essential Guide to Delta Single Handle Bathroom Faucet Aerator Replacement
Maintaining a pristine bathroom requires attention to detail, including the functionality of your fixtures. One crucial component that often goes unnoticed is the aerator, a small but mighty device nestled within the faucet's spout. If your Delta single handle bathroom faucet is underperforming, it's worth considering replacing its aerator, which can restore optimal water flow and prevent unnecessary splashing.
Replacing a Delta single handle bathroom faucet aerator is a relatively straightforward task that can be accomplished with a few simple tools and a bit of patience. Whether you're experiencing reduced water pressure, uneven water streams, or bothersome noise from the faucet, a new aerator can often resolve these issues and restore your faucet's performance.
Tools Required:
- Basin wrench or multi-grip pliers
- Cloth or paper towels
- Replacement Delta aerator (typically included with new Delta faucets)
Step-by-Step Instructions:
1. Turn Off Water Supply: Begin by closing the water supply valves located beneath the sink. This step is crucial to prevent water from gushing out during the replacement process.
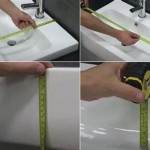
2. Remove Existing Aerator: Using a basin wrench or multi-grip pliers, gently unscrew the old aerator from the faucet spout by turning it counterclockwise. Protect the faucet finish by wrapping a cloth or paper towel around the base of the aerator before using the pliers.
3. Clean Faucet Spout: Once the old aerator is removed, inspect the faucet spout for any debris or mineral buildup. Cleaning the spout ensures that the new aerator will have a clean surface to seal against.
4. Install New Aerator: Take the new Delta aerator and align it with the threads on the faucet spout. Manually tighten the aerator by turning it clockwise until it is snug. Avoid overtightening, as this can damage the aerator's O-ring.
5. Turn On Water Supply and Check for Leaks: Reopen the water supply valves beneath the sink and turn on the faucet. Inspect the connection between the aerator and the faucet spout for any leaks. If leaks occur, retighten the aerator slightly until the leak stops.
Tips:
- If your Delta faucet is still under warranty, contact Delta Customer Service before attempting to replace the aerator.
- Replace the aerator every 6-12 months or as needed to maintain optimal performance.
- Using a multi-stream aerator can reduce water consumption while still providing a satisfying water flow.
Conclusion:
Replacing a Delta single handle bathroom faucet aerator is a simple and cost-effective way to revitalize your faucet's functionality. By following these steps carefully, you can restore optimal water flow, eliminate splashing, and enjoy a more pleasant bathroom experience. Remember to inspect your aerator regularly and replace it as needed to ensure continued flawless performance.

Aerator 2 Gpm In Chrome Rp32529 Delta Faucet

How To Fix Your Flow Delta Faucet Blog

Delta Foundations 4 In Centerset Single Handle Bathroom Faucet With Metal Drain Assembly Chrome B510lf The Home Depot

Repair Parts For One And Two Handle Delta Bathroom Faucets

Delta Lahara 1 5 Gpm Bathroom Sink Faucet Aerator In Chrome Rp54977 The Home Depot

Delta Rp76076 Aerator And Wrench Build Com

Delta Foundations 4 In Centerset Single Handle Bathroom Faucet Chrome B510lf Ppu Eco The Home Depot

Cache Aerators Recessed Or Faucet Faqs

Delta Ara Single Hole Handle Bathroom Faucet With Metal Drain Assembly In Stainless 567lf Ssmpu The Home Depot

Delta Faucet 501lf Hgmhdf Single Lever Deck Mount Lavatory With Vandal Resistant Handle And
Related Posts