DIY Bathroom Counter Storage Tower: A Step-by-Step Guide
A cluttered bathroom counter can be a source of frustration and stress. Often, the limited space in a bathroom leads to an accumulation of toiletries, cosmetics, and other essential items, creating a chaotic and unappealing environment. A practical and stylish solution to this dilemma is a DIY bathroom counter storage tower. This project allows you to maximize your counter space, keep your belongings organized, and enhance the overall aesthetic of your bathroom.
This step-by-step guide offers a comprehensive plan for creating a personalized bathroom counter storage tower. It provides instructions on materials, tools, and techniques for assembling your own custom storage solution. The process involves selecting appropriate materials, cutting and assembling the structure, and adding finishing touches to achieve a polished and functional outcome.
Choosing Materials and Tools
The first step in creating a DIY bathroom counter storage tower involves selecting the right materials and tools. The choice of materials will depend on your desired style, budget, and the weight of the items you plan to store. For example, lightweight materials like wood or plastic are suitable for storing smaller items, while sturdy materials like metal or bamboo can accommodate heavier objects.
Here is a list of essential materials and tools for this project:
- Wood: Pine, plywood, or MDF boards are commonly used for bathroom storage towers. Choose boards with a thickness of at least 3/4 inch for stability.
- Cutting tools: A circular saw, miter saw, or jigsaw are necessary for cutting the wood to size. A handheld saw can also be used, but it may require more time and effort.
- Measuring tools: A tape measure, ruler, and pencil are essential for accurate measurements and markings.
- Screwdriver: A drill with a variety of drill bits and a screwdriver are needed for assembling the structure.
- Sandpaper: Different grit sandpaper will be used to smooth out the edges of the wood and prepare the surface for painting or staining.
- Wood glue: This will strengthen the joints and create a more secure bond within the structure.
- Paint or stain: Choose a finish that complements the existing decor in your bathroom and protects the wood from moisture.
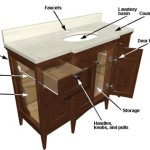
- Hardware: This includes hinges, handles, drawer slides, and other fixtures you prefer to include in your storage tower.
Assembling the Storage Tower
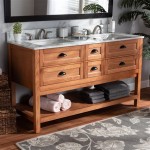
Once you have gathered all the necessary materials and tools, you can begin assembling the storage tower. Start by carefully measuring and cutting the wood pieces according to your design. The tower can be constructed using different methods, including shelves, drawers, or a combination of both. Ensure that all pieces are cut precisely to ensure stability and a clean finish.
Here are some common assembly techniques:
- Shelves: Cut shelves to the desired length and width, and attach them to the sides of the tower using wood screws. You can add decorative supports or brackets for a more custom look.
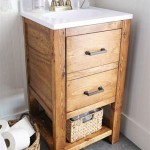
- Drawers: Cut out drawer fronts and sides, and attach them together with wood glue and screws. Add drawer slides to the sides of the tower, and install the drawers for easy access to your items.
- Combination of Shelves and Drawers: You can create a multi-functional storage tower by incorporating both shelves and drawers. This provides flexibility for storing various items of different sizes.
Finishing Touches
After assembling the storage tower, it's time to add the finishing touches. This includes sanding the surfaces, painting or staining the wood, and installing hardware. Sanding smooths out any rough edges and prepares the surface for paint or stain. When choosing paint or stain, consider the overall aesthetics of your bathroom and the desired look for your storage tower.
For a more personalized finish, consider adding decorative elements such as stencils, vinyl decals, or wallpaper. You can also incorporate baskets, bins, or containers within the tower for additional organization. Once the tower is complete, place it on your bathroom counter and enjoy the benefits of a well-organized and stylish storage solution.
Key Points to Remember
When embarking on your DIY bathroom counter storage tower project, it's crucial to keep the following points in mind:
Choose a Design That Suits Your Needs
Before starting the project, consider your bathroom's layout and the items you need to store. A well-planned design ensures that the storage tower fits seamlessly into your space and accommodates all your essentials.
Prioritize Durability and Moisture Resistance
Bathroom environments are prone to moisture and humidity. Select materials that are resistant to water damage and can withstand the frequent changes in temperature. Waterproof finishes and sealants can further enhance the durability of your storage tower.
Consider Functionality and Accessibility
Design the tower with ease of access in mind. Ensure that shelves and drawers are positioned at comfortable heights and that items can be easily reached. This will create a functional and user-friendly storage solution.
By following these steps and paying attention to the key points, you can create a DIY bathroom counter storage tower that enhances both the functionality and aesthetic appeal of your bathroom. This customizable project allows you to tailor the design to your specific needs and preferences, resulting in a personal and practical storage solution that will make your bathroom a more organized and enjoyable space.

Easy Diy Bathroom Countertop Cabinet The Lived In Look

Easy Diy Bathroom Countertop Cabinet The Lived In Look

490 Bathroom Storage Tower Ideas Towers

Easy Diy Bathroom Countertop Cabinet The Lived In Look

Bathroom Vanity Storage Tower

Bathroom Vanity Storage Tower

Easy Diy Bathroom Countertop Cabinet The Lived In Look

Bathroom Vanity Storage Tower

Bath Storage Tower

Vanity Towers Take Bathroom Storage To New Heights