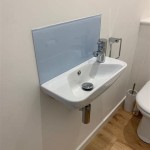
DIY Floating Bathroom Sink Shelf: A Guide to Adding Storage and Style
A floating bathroom sink shelf is a stylish and functional addition to any bathroom. It offers a convenient place to store toiletries, towels, and other bathroom essentials while maintaining a clean and uncluttered look. This DIY project is relatively simple and requires minimal tools and materials, making it a great option for homeowners with limited time and budget.
1. Planning and Preparation
Before embarking on the project, careful planning is crucial. Consider the following factors:
- Shelf Size and Placement: Measure the area where the shelf will be installed to determine the optimal size and placement. Account for existing fixtures, pipes, and other obstructions.
- Material Choice: Choose a material for the shelf that complements the bathroom's aesthetic and is moisture-resistant. Common options include wood, metal, and acrylic.
- Mounting Hardware: Select appropriate mounting hardware based on the wall material and the weight of the shelf and its contents. For drywall, wall anchors or specialized screws are necessary.
- Tools and Materials: Gather all necessary tools, including a tape measure, level, pencil, drill, saw (if cutting shelf material), sandpaper, mounting hardware, and the chosen shelf material.
2. Assembling the Shelf
Once the plan is finalized, begin assembling the shelf. This process may vary depending on the type of shelf being constructed.
- Cutting the Shelf: If using a solid piece of material, cut it to the desired size using a saw. Ensure clean and precise cuts for a polished look.
- Building a Frame: For a framed shelf, assemble the frame using wood or metal, ensuring the corners are secure and square.
- Adding Finishing Touches: After assembly, sand the edges of the shelf to remove any rough spots. Apply a sealant or stain to protect the material from moisture and enhance its appearance.
3. Installing the Shelf
Once the shelf is assembled and finished, it’s time to install it.
- Marking the Mounting Points: Use a level to mark the wall where the shelf will be mounted. Ensure the shelf is level and centered according to the design.
- Drilling Holes: Drill pilot holes at the marked locations. For drywall, use appropriate wall anchors for secure support.
- Attaching the Shelf: Secure the shelf to the wall using the chosen mounting hardware. Apply even pressure to ensure the shelf is firmly attached.
- Final Touches: Once the shelf is installed, double-check its stability and level. If necessary, adjust the mounting positions for optimal alignment.
Creating a floating bathroom sink shelf is a rewarding DIY project that can enhance the aesthetic and functionality of any bathroom. With careful planning, proper tools, and a little effort, homeowners can achieve a stylish and practical solution for organizing bathroom essentials.

Diy Floating Bathroom Vanity Remodelando La Casa

Diy Floating Bathroom Vanity Remodelando La Casa

How To Diy Your Own Floating Vanity Kristina Lynne

Floating Vanity Diy Modern Bathroom Decor

How To Build A Diy Floating Vanity With Wood For Less Than 30

How To Build A Diy Modern Floating Vanity Or Tv Console

How To Make A Wood Floating Vanity Construction2style

How To Build A Diy Modern Floating Vanity Or Tv Console

Diy Floating Wood Vanity Step By Infarrantly Creative

Diy Floating Bathroom Shelves Shades Of Blue Interiors
Related Posts