Fix Leak Under Bathroom Sink is a verb phrase containing three words: -
Fix
: verb (repair, mend) -Leak
: noun (a hole or crack that allows liquid to escape) -Under Bathroom Sink
: prepositional phrase (below the sink in the bathroom) When combined, this verb phrase describes the action of repairing a leak that is located below a bathroom sink. This task requires a combination of plumbing skills and tools.Essential Aspects of Fixing a Leak Under a Bathroom Sink
Fixing a leak under a bathroom sink may seem like a minor inconvenience, but it's essential to address it promptly to prevent further damage. If left unattended, leaks can lead to mold growth, water damage, and costly repairs. Several essential aspects must be considered when tackling this task effectively.
1. Identifying the Source of the Leak
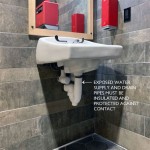
The first step in fixing a leak is to identify its source. The most common causes of bathroom sink leaks include loose connections, worn-out washers, faulty faucets, or damaged pipes. Inspect the area around the sink, including the faucet, drain, and pipes, to find the source of the leak.
2. Gathering Necessary Tools and Materials
Before starting the repair, gather the necessary tools and materials. This typically includes a wrench, pliers, a basin or bucket, a flashlight, and replacement parts if needed (e.g., washers, gaskets, or sealant).
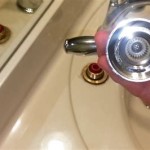
3. Shutting Off the Water Supply
To prevent water from gushing out while repairing the leak, shut off the water supply to the sink. Locate the shut-off valves under the sink and turn them clockwise to close them completely.
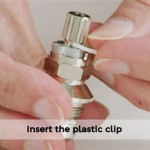
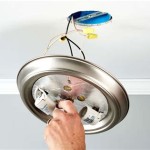
4. Dismantling the Faucet
Depending on the location and type of leak, you may need to dismantle the faucet to access the faulty component. Use a wrench to loosen the nuts holding the faucet in place and carefully remove it.
5. Replacing Worn-out Components
Once you've identified the worn-out component responsible for the leak, replace it with a new one. For example, you may need to replace a washer, gasket, or O-ring. Make sure to use the correct size and type of replacement part.
6. Reassembling and Tightening
After replacing the faulty component, reassemble the faucet and tighten all the nuts and connections securely. Use pliers or a wrench to ensure the parts are firmly in place to prevent future leaks.
7. Turning On the Water Supply
Once the repairs are complete, turn the water supply back on and check for any remaining leaks. If the leak has been fixed, the water should flow smoothly without any drips or leaks.
Remember, while this article provides a general overview of the essential aspects of fixing a leak under a bathroom sink, it's always advisable to seek professional help from a licensed plumber if you're not confident in your plumbing skills or if the leak is significant.

How To Fix A Leaking Bathroom Sink Paschal Air Plumbing Electric

Common Sink Leaks You Could Probably Fix Yourself

Bathroom Sink Drain Leaking Around Threads Premier Plumbing Inc

How To Fix Constant Leak Under Bathroom Bunnings Work Community

Bathroom Sink Drain Leaking Around Threads Premier Plumbing Inc

How To Fix Pipework A Tap Faucet Leaking Under The Sink

How To Fix Constant Leak Under Bathroom Bunnings Work Community

Hose Under Your Sink Is Leaking Here S What You Have To Do

Bathroom Sink Drain Leak Not Sure How To Fix Doityourself Com Community Forums

4 Ways To Fix A Bathroom Sink Leaking Underneath Fast Easy
Related Posts