Essential Aspects of Fixing a Leaky Delta Bathroom Faucet
A leaky bathroom faucet can be a frustrating and wasteful problem. Not only can it waste water and increase your utility bills, but it can also damage your bathroom fixtures and flooring. Fortunately, fixing a leaky Delta bathroom faucet is a relatively simple task that can be completed with a few basic tools.
In this article, we will discuss the essential aspects of fixing a leaky Delta bathroom faucet, including:
- Identifying the source of the leak
- Choosing the correct replacement parts
- Disassembling the faucet
- Replacing the faulty parts
- Reassembling the faucet
By following these steps, you can easily fix a leaky Delta bathroom faucet and save yourself the time, money, and hassle of calling a plumber.
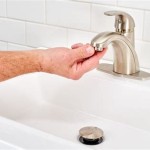
Identifying the Source of the Leak
The first step in fixing a leaky Delta bathroom faucet is to identify the source of the leak. This can be done by simply turning on the faucet and observing where the water is coming from. The most common sources of leaks in Delta bathroom faucets are:
- The O-rings
- The cartridge
- The aerator
Once you have identified the source of the leak, you can proceed to the next step.
Choosing the Correct Replacement Parts
Once you know the source of the leak, you need to choose the correct replacement parts. Delta bathroom faucets use a variety of different parts, so it is important to choose the ones that are specific to your model. You can find the correct replacement parts by visiting the Delta website or by consulting a plumbing supply store.
When choosing replacement parts, it is important to look for high-quality parts that are made from durable materials. This will help to ensure that your faucet does not leak again in the future.
Disassembling the Faucet
Once you have the correct replacement parts, you can begin to disassemble the faucet. The steps for disassembling a Delta bathroom faucet will vary depending on the model, but the general steps are as follows:
- Turn off the water supply to the faucet.
- Remove the aerator.
- Remove the handle.
- Remove the cartridge.
Once the faucet is disassembled, you can proceed to the next step.
Replacing the Faulty Parts
Once you have disassembled the faucet, you can replace the faulty parts. The steps for replacing the faulty parts will vary depending on the part that is being replaced, but the general steps are as follows:
- Remove the old part.
- Install the new part.
Once the faulty parts have been replaced, you can proceed to the next step.
Reassembling the Faucet
Once the faulty parts have been replaced, you can reassemble the faucet. The steps for reassembling the faucet will vary depending on the model, but the general steps are as follows:
- Install the cartridge.
- Install the handle.
- Install the aerator.
- Turn on the water supply to the faucet.
Once the faucet is reassembled, you can test it to make sure that it is working properly. If the faucet is still leaking, you may need to call a plumber to help you fix it.

Simple Ways To Fix A Leaky Delta Bathroom Sink Faucet

Sink Faucet Repair Delta Bathroom Drips

How To Repair Leaking Dripping Delta Faucet Diyplumbing Serviceplumbing Tappplumbing

Simple Ways To Fix A Leaky Delta Bathroom Sink Faucet

How To Fix A Leaky Delta Two Handle Faucet

Simple Ways To Fix A Leaky Delta Bathroom Sink Faucet

Simple Ways To Fix A Leaky Delta Bathroom Sink Faucet

How To Fix Leaky Bathroom Handle Delta Faucet Model 4530 Series Hard Water

Simple Ways To Fix A Leaky Delta Bathroom Sink Faucet

How To Fix A Leaky Faucet Delta Blog
Related Posts