Essential Aspects of Glacier Bay Bathroom Sink Installation Instructions
Installing a Glacier Bay bathroom sink requires careful attention to specific aspects of the instruction manual to ensure a successful and functional installation. These aspects serve as crucial guidelines for performing the task correctly and efficiently.
This article will delve into the essential aspects of Glacier Bay Bathroom Sink Installation Instructions, providing homeowners with a comprehensive understanding of the key steps and considerations involved in the installation process.
1. Preparation
Adequate preparation is paramount before commencing the installation. Gather all the necessary tools and materials, including a sink strainer, drain assembly, plumber's putty, and silicone sealant. Carefully read through the instruction manual to familiarize yourself with the steps and identify any potential complications.
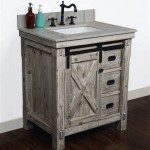
2. Sink Placement and Leveling
Determine the exact placement of the sink and mark the corresponding holes on the countertop. Apply plumber's putty to the underside of the sink flange and gently set the sink into place. Use a level to ensure the sink is level and adjust the putty accordingly.
3. Drain Assembly Installation
Install the drain assembly by attaching the tailpipe to the drain flange. Secure the tailpiece with a locknut and washer. Apply a bead of silicone sealant around the base of the drain assembly to prevent leaks.
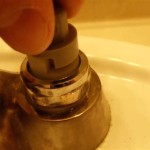
4. Faucet Installation
Follow the manufacturer's instructions for installing the faucet on the sink. Ensure that the water supply lines are connected correctly to the hot and cold water valves. Tighten all connections securely to prevent leaks.
5. Final Connections and Sealant
Connect the drainpipe to the tailpiece and secure it with a hose clamp. Apply additional silicone sealant around the edge of the sink where it meets the countertop to prevent water damage.
6. Inspection and Testing
Before using the sink, conduct a thorough inspection of all connections to ensure they are secure and free of leaks. Turn on the water supply and check for any drips or leaks. If necessary, adjust the sealant or tighten connections as required.
Conclusion
By following these essential aspects of Glacier Bay Bathroom Sink Installation Instructions, homeowners can confidently undertake the installation process, ensuring a functional and aesthetically pleasing bathroom sink.

Glacier Bay Constructor 4 In Centerset 2 Handle Low Arc Bathroom Faucet Brushed Nickel Hd67499w 6404 The Home Depot

How To Install A Glacier Bay Sink On Vimeo

Glacier Bay Fastmount System

Glacier Bay Oswell 4 In Centerset 2 Handle High Arc Bathroom Faucet Matte Black Hd67083w 6010h The Home Depot

Glacier Bay 22 4 In Ceramic Rectangular Undermount Bathroom Sink White With Overflow Drain Lvb1037 The Home Depot

Glacier Bay 23 6 In Ceramic Rectangular Vessel Bathroom Sink White With Overflow Drain Lw1828 The Home Depot

How To Install A Kitchen Faucet Glacier Bay Mckenna Pull Down

How To Install A Glacier Bay Kitchen Faucet

Homeowner S Guide To Drop In Bathroom Sinks The Family Handyman

Replacing A Bathroom Faucet Fine Homebuilding
Related Posts