Building Your Own Homemade Bathroom Sink: A Step-by-Step Guide
Crafting a homemade bathroom sink is a rewarding and cost-effective project that adds a unique touch to your bathroom. By following these essential steps, you can create a functional and stylish sink that meets your needs and aesthetic preferences.
Materials and Tools
Before you begin, gather the necessary materials and tools:
- Basin of your choice (e.g., ceramic, glass, metal)
- Countertop or vanity
- Drain and faucet
- Silicone caulk
- Adhesive or epoxy
- Level
- Plywood or cement board (optional)
- Jigsaw or circular saw
- Drill
Step 1: Plan and Prepare
Decide on the location and type of sink you wish to install. If you're mounting the sink to a countertop, consider the weight of the basin and the strength of the counter. Prepare the countertop by marking the outline of the sink's opening.
Step 2: Build a Base (Optional)
For added support, especially with heavier basins, create a base beneath the countertop. Cut plywood or cement board to fit the space and secure it with screws. This provides a stable foundation for the sink.
Step 3: Cut the Opening
Use a jigsaw or circular saw to carefully cut the opening in the countertop or base. Ensure the opening is slightly smaller than the base of the sink to allow for caulk.
Step 4: Dry Fit the Sink
Place the sink into the opening to check if it fits properly. Adjust the opening if necessary, ensuring the sink sits level.
Step 5: Apply Adhesive
Apply adhesive or epoxy around the sink's rim. If using a countertop with a soft material like granite, use a silicone adhesive that won't damage the surface.
Step 6: Install the Sink
Carefully lift the sink into place and press it down firmly into the adhesive. Ensure it's level and secure. Allow the adhesive to cure according to the manufacturer's instructions.
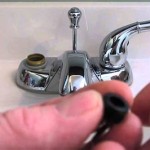
Step 7: Install the Drain and Faucet
Assemble the drain and faucet according to their manuals. Insert the drain into the sink and tighten the nuts. Connect the faucet to the water supply lines and secure it to the sink.
Step 8: Caulk and Finish
Apply a generous bead of silicone caulk around the edges of the sink where it meets the countertop or base. Smooth the caulk with your finger or a damp cloth. Allow the caulk to dry completely before using the sink.
Tips for a Successful Homemade Sink
- Choose a basin that complements your bathroom's style and size.
- Use high-quality materials for durability and functionality.
- Measure carefully and double-check before cutting any openings.
- Allow ample time for the adhesive to cure before using the sink.
- Consider hiring a professional for complex installations or if you have limited experience.
Conclusion
Building a homemade bathroom sink is a rewarding project that can enhance the look and functionality of your bathroom. By following these steps and utilizing high-quality materials, you can create a custom sink that meets your unique needs and style.

10 Diy Bathroom Vanity Ideas The Family Handyman

Diy Bathroom Vanity 12 Rehabs Bob Vila
:max_bytes(150000):strip_icc()/build-something-diy-vanity-594402125f9b58d58ae21158.jpg?strip=all "16 Diy Bathroom Vanity Plans You Can Build Today")
16 Diy Bathroom Vanity Plans You Can Build Today

How To Build A Diy Bathroom Vanity Angela Marie Made

Rustic Bathroom Vanity Kreg Tool

10 Diy Bathroom Vanity Ideas The Family Handyman

Diy Bathroom Vanity For 65 Angela Marie Made

13 Crazy Creative Diy Bathroom Vanities Decoist
:max_bytes(150000):strip_icc()/athomewithashley-07bb4ab1f6354e50b32cef75d1fba3ec.jpg?strip=all "25 Diy Bathroom Vanity Ideas Perfect For Storage")
25 Diy Bathroom Vanity Ideas Perfect For Storage
:max_bytes(150000):strip_icc()/diy-bathroom-vanity-594406a93df78c537ba769dc.jpg?strip=all "16 Diy Bathroom Vanity Plans You Can Build Today")
16 Diy Bathroom Vanity Plans You Can Build Today
Related Posts