How Do I Fix My Dripping Bathroom Faucet
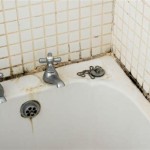
Although replacing a bathroom faucet might seem like a quick fix, it can be quite costly and time-consuming. A dripping faucet can waste a lot of water, leading to higher water bills and potential water damage. Fortunately, fixing a dripping faucet is often a simple and inexpensive task that can be completed in a matter of minutes. ### Essential Aspects of Fixing a Dripping Bathroom Faucet The key to successfully fixing a dripping bathroom faucet lies in identifying the source of the leak and addressing it appropriately. Common causes of faucet drips include worn-out washers, faulty O-rings, loose valve stems, and damaged seals. ### Identifying the Source of the Leak The first step in fixing a dripping faucet is to identify the source of the leak. Here are some tips for doing so: -Check the aerator:
The aerator is the small screen attached to the end of the faucet spout. If the aerator is clogged with debris, it can cause water to drip from the faucet. -Inspect the O-rings:
O-rings are rubber seals that create a watertight seal around the base of the faucet handle and spout. If an O-ring is worn or damaged, it can allow water to leak. -Examine the washer:
The washer is a rubber seal that sits inside the faucet handle and prevents water from leaking out. If the washer is worn or damaged, it can cause a drip. -Check the valve stem:
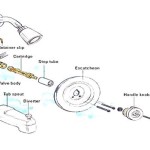
The valve stem is the metal rod that turns the water on and off. If the valve stem is loose or damaged, it can allow water to leak. ### Repairing the Leak Once you have identified the source of the leak, you can begin repairing it. Here are some tips for repairing common faucet leaks: -Replace the aerator:
If the aerator is clogged, simply unscrew it and replace it with a new one. -Replace the O-rings:
To replace the O-rings, first remove the faucet handle. Then, use a small screwdriver to pry out the old O-rings and replace them with new ones. -Replace the washer:
To replace the washer, first remove the faucet handle and then unscrew the packing nut. Then, remove the old washer and replace it with a new one. -Tighten the valve stem:
If the valve stem is loose, simply tighten it using a wrench.
How To Fix A Dripping Moen Faucet Howtolou Com

5 Reasons Your Faucet Is Dripping Water How To Fix It

How To Fix A Leaky Faucet True Value

Part 1 Of 2 How To Fix A Dripping Faucet

How To Fix A Leaky Faucet The Home Depot

How To Fix A Leaking Bathtub Faucet Diy Family Handyman

Properly Fixing A Leaky Sink Faucet Wallside Windows

How To Fix A Leaking Bathroom Faucet Quit That Drip

How To Fix A Leaky Faucet Guides For Every Design And Style

How To Fix A Leaky Faucet Guides For Every Design And Style
Related Posts