How Do You Remove A Bathroom Sink Faucet Handle
Bathroom sink faucet handles are an essential part of any bathroom. They allow you to control the flow of water and adjust the temperature. If your faucet handle is damaged or not working properly, it can be a real inconvenience. Fortunately, removing a bathroom sink faucet handle is a relatively easy task that can be done in a few minutes.
Before you begin, you will need to gather a few tools. You will need a screwdriver, a pair of pliers, and a wrench. You may also need a bucket or bowl to catch any water that spills out of the faucet.
### Step 1: Turn Off the Water SupplyThe first step is to turn off the water supply to the faucet. This will prevent any water from leaking out when you remove the handle.
### Step 2: Remove the AeratorThe aerator is the small, screen-like device that is attached to the end of the faucet. It helps to aerate the water and create a more even flow. To remove the aerator, simply unscrew it by hand.
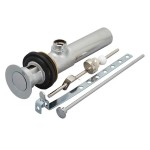
### Step 3: Remove the Handle ScrewOnce the aerator is removed, you will see a screw in the center of the handle. This screw is what holds the handle in place. Use a screwdriver to remove the screw.
### Step 4: Remove the HandleOnce the screw is removed, you should be able to pull the handle straight off of the faucet. If the handle is stuck, you can use a pair of pliers to gently pry it loose.
### Step 5: Remove the CartridgeOnce the handle is removed, you will see the cartridge. The cartridge is what controls the flow of water and adjusts the temperature. To remove the cartridge, simply unscrew it by hand.
### Step 6: Replace the CartridgeIf the cartridge is damaged or not working properly, you will need to replace it. To do this, simply screw a new cartridge into the faucet. Make sure to tighten the cartridge securely.
### Step 7: Reassemble the FaucetOnce the cartridge is replaced, you can reassemble the faucet. To do this, simply insert the handle into the faucet and tighten the screw. Then, screw the aerator back onto the faucet.
### Step 8: Turn On the Water SupplyOnce the faucet is reassembled, you can turn on the water supply. Check for any leaks and make sure that the faucet is working properly.

How Do I Replace Bathroom Sink Faucet Handles Cleaning More

How To Remove Moen Bathroom Faucet Handle In 2 Steps

Diy How To Replace A Bathroom Sink Faucet Remove Install

How To Remove And Install A Bathroom Faucet

Tips Tricks Remove Delta 2 Handle 4 In Bathroom Sink Faucet With Bar 5 21 18

Replacing A Bathroom Faucet Fine Homebuilding

How To Change The Handle Rotation On A Faucet

How To Replace Bathroom Sink Faucet Handles Ehow

How To Fix A Leaking Faucet Handle Replacing Stem Assembly

How To Remove Moen Bathroom Sink Faucet Handles Faucets
Related Posts