How Do You Remove An Old Nutone Bathroom Fan?
A bathroom fan plays a vital role in ventilating moisture and odors from the bathroom, thus preventing mold and mildew growth. Over time, your Nutone bathroom fan may become old, noisy, or inefficient, necessitating its replacement. Removing an old Nutone bathroom fan may seem like a daunting task, but with the right tools and a step-by-step guide, you can easily accomplish it.
Step 1: Safety First
Before you start any electrical work, ensure you turn off the power to the bathroom fan from the circuit breaker or fuse box. This crucial safety measure prevents the risk of electrical shock.
Step 2: Gather Your Tools
To remove your Nutone bathroom fan, you will need the following tools:
- Screwdriver
- Pliers
- Utility knife or wire cutters
- Safety glasses
- Work gloves
- Ladder (if necessary)
Step 3: Remove the Fan Cover
Locate the screws securing the fan cover in place and use the appropriate screwdriver to remove them. Once the screws are removed, gently pull the cover off the fan housing.
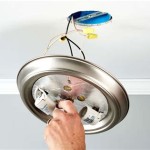
Step 4: Disconnect the Wiring
Inside the fan housing, you will find several wires connected to the fan motor. Use the pliers to carefully disconnect these wires. Be mindful of the wiring configuration, as you will need to reconnect them correctly when installing the new fan.
Step 5: Remove the Mounting Bracket
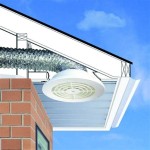
Locate the screws securing the mounting bracket to the ceiling or wall. Using the screwdriver, remove these screws and detach the mounting bracket from the fan housing. You may need to use a utility knife or wire cutters to sever any caulking or sealant around the mounting bracket.
Step 6: Remove the Fan Housing
Once the mounting bracket is removed, you can proceed to remove the fan housing. Carefully lift the fan housing off the ceiling or wall and set it aside.
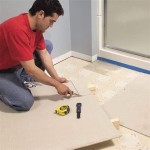
Step 7: Clean the Area
Take this opportunity to clean the area where the old fan was installed. Remove any dust, debris, or old insulation from the ceiling or wall. This will ensure a clean and proper installation of the new fan.
Step 8: Install the New Fan
Follow the instructions provided with your new bathroom fan to install it properly. Typically, this involves securing the mounting bracket to the ceiling or wall, connecting the wiring, and attaching the fan housing. Ensure the fan is correctly aligned and securely fastened.
Step 9: Power On and Test
Once the new fan is installed, turn on the power and test it to ensure it is functioning correctly. Check for proper ventilation and listen for any unusual noises or vibrations.
Conclusion
Removing an old Nutone bathroom fan is a straightforward task that can be accomplished with the right tools and a step-by-step guide. By following these steps safely and carefully, you can ensure a successful fan replacement and enjoy the benefits of a well-ventilated bathroom.

Not Sure How To Remove Old Bathroom Fan Install New One Doityourself Com Community Forums

How To Remove Nutone Bathroom Fan Light Cover 2024 Guide Home Inspector Secrets

How To Remove Nutone Bathroom Fan Light Cover 2024 Guide Home Inspector Secrets

Removing Cleaning Old Kitchen Exhaust Fan Doityourself Com Community Forums

Removing Cleaning Old Kitchen Exhaust Fan Doityourself Com Community Forums

Nutone Bath Fan Upgrade Kit Model 690nt

Broan Nutone Bath Fan Model 765h80l Disassembly Repair Help

How To Replace A Bathroom Exhaust Fan Without Attic Access 12 Step Guide Home Inspector Secrets

Nutone S Qt80nb Bath Fan Repair Replace Or Upgrade Options

How To Remove A Nutone Bathroom Fan Light Cover Quora