How to Caulk a Bathroom Sink
A well-caulked bathroom sink creates a seamless and hygienic barrier between the sink and the countertop. This prevents moisture from seeping into the surrounding area, reducing the risk of mold and mildew growth. Caulking also enhances the aesthetic appeal of the bathroom, providing a clean and finished look. Replacing old or damaged caulk is an essential part of bathroom maintenance, and it is a relatively simple DIY project that can be accomplished with the right tools and techniques.
Preparing the Sink and Countertop
Before applying any new caulk, it is crucial to prepare the surfaces thoroughly. This involves removing the old caulk, cleaning the area, and ensuring that both the sink and countertop are dry.
Start by removing the old caulk using a utility knife or a caulk removal tool. Carefully slice along the edge of the old caulk, separating it from the sink and countertop. Once the caulk is loosened, gently pry it away, taking care not to damage the surrounding surfaces. If any residue remains, scrape it off using a putty knife.
Next, clean the area using a damp cloth and a mild cleaner. Avoid using harsh chemicals or abrasive cleaners, as they can damage the surfaces. After cleaning, thoroughly dry the sink and countertop. This ensures that the new caulk adheres properly to the surfaces.
Applying the New Caulk
Once the surfaces are prepared, it is time to apply the new caulk. Choose a high-quality, silicone-based caulk specifically designed for bathrooms. These types of caulk are resistant to mold and mildew, making them ideal for humid environments.
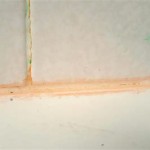
Cut the nozzle of the caulk tube at a 45-degree angle, creating a small opening that will allow for a smooth application. Apply a bead of caulk along the edge of the sink, ensuring that the caulk is smooth and even. Use a caulk gun to apply the caulk, squeezing the trigger gently to release a steady stream.
When applying the caulk, it is essential to maintain a continuous bead without any gaps or breaks. If necessary, stop and restart the application, ensuring that the new bead seamlessly connects to the existing one.
Smoothing and Finishing
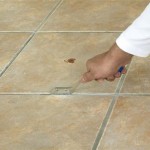
After applying the caulk, use a wet finger or a caulk tool to smooth and shape it. Run your finger or the tool along the bead, creating a smooth and even line. This step helps to create a professional finish and prevents the caulk from cracking or peeling.
Once the caulk is smoothed, it is time to let it dry completely. Allow the caulk to cure for at least 24 hours, or according to the manufacturer's instructions. During this time, avoid using the sink or allowing any water to come into contact with the caulk.
Once the caulk has dried completely, it can be cleaned using a damp cloth. This removes any excess caulk and leaves the surface clean and ready for use.
Tips for a Successful Caulking Job
To ensure a successful caulking job, consider these tips for best results:
*
Choose the right caulk:
Select a silicone-based caulk designed for bathrooms, as it is resistant to mold and mildew.*
Prepare the surfaces thoroughly:
Remove old caulk, clean the area, and ensure that the surfaces are dry.*
Use a caulk gun:
A caulk gun provides a controlled and even application of caulk.*
Smooth the caulk:
Use a wet finger or a caulk tool to create a smooth and even finish.*
Allow the caulk to cure completely:
Patience is key! Allow the caulk to dry completely before using the sink or exposing it to water.*
Maintain the caulk:
Periodically inspect the caulk for any signs of damage or wear. Replace damaged caulk as needed to prevent leaks and maintain a clean and hygienic bathroom.
How To Re Caulk A Bathroom Sink Ifixit Repair Guide

How To Re Caulk A Bathroom Sink Ifixit Repair Guide

Here S How To Caulk Around Bathroom And Kitchen Fixtures

How To Re Caulk A Bathroom Sink Ifixit Repair Guide

How To Re Caulk A Bathroom Sink Ifixit Repair Guide

How To Re Caulk A Sink

How To Re Caulk A Bathroom Sink Ifixit Repair Guide

How To Caulk A Bathroom Sink 12 Steps With Pictures Wikihow

How To Re Caulk A Bathroom Sink Ifixit Repair Guide

How To Caulk Like A Professional The Home Depot
Related Posts