How To Change A Bathroom Mixer Tap Cartridge
Mixer taps offer convenient temperature control and a sleek aesthetic, but their internal workings can sometimes present challenges. A malfunctioning cartridge, the heart of the mixer tap's operation, can lead to drips, inconsistent temperatures, or complete water stoppage. Replacing the cartridge is a manageable task for most homeowners, offering a cost-effective alternative to replacing the entire tap.
Before embarking on this project, gathering the necessary tools is crucial. These typically include a flathead screwdriver, an adjustable wrench, a Phillips screwdriver (depending on the tap model), and possibly some penetrating oil. Crucially, identifying the correct replacement cartridge is essential. This requires knowing the make and model of the tap, information often found on the tap itself or in the original documentation. Contacting the manufacturer directly is sometimes necessary if these details are unavailable.
The initial step involves isolating the water supply. Locate the isolation valves under the sink. Turn both the hot and cold valves clockwise until fully closed. This prevents water flow during the repair process and minimizes the risk of flooding. Once the water is off, turn the tap on in both the hot and cold positions to release any residual pressure within the pipes.
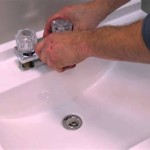
Removing the tap handle is the next stage. Depending on the tap design, this might involve unscrewing a cap on top of the handle to reveal a screw beneath, or there might be a small grub screw located underneath or at the side of the handle. A flathead screwdriver or an Allen key (for grub screws) are typically required. Once any securing screws are removed, the handle can be lifted off the tap body.
With the handle removed, the cover plate or shroud, which often conceals the cartridge, becomes accessible. This might be screwed on or held in place by a retaining nut. Carefully remove this component, taking note of its orientation and any seals or washers for correct reassembly. This exposes the cartridge retaining nut, often a large nut directly behind the handle assembly. An adjustable wrench is typically used to loosen and remove this nut.
Once the retaining nut is removed, the cartridge can be extracted. Sometimes the cartridge slides out easily, while in other cases, it might require gentle persuasion. If the cartridge is stuck, applying penetrating oil around the base and allowing it to penetrate for a few minutes can help loosen it. Avoid excessive force, as this can damage the tap body. A pair of pliers can be used to grip the cartridge for removal, ensuring not to damage the cartridge body itself.
With the old cartridge removed, compare it to the new replacement to confirm it's the correct model. Insert the new cartridge, ensuring it aligns correctly with the tap body. Any O-rings or seals should be intact and properly positioned. Replace the retaining nut, tightening it firmly but not excessively, to avoid damaging the cartridge or the tap body. Over-tightening can also lead to operational difficulties.
Reassembly follows the reverse order of disassembly. Replace the cover plate or shroud, ensuring any seals or washers are correctly positioned. Reattach the tap handle, securing it with the screw or grub screw removed earlier. Before turning the water supply back on, ensure the tap handle is in the off position to prevent sudden pressure surges.
Slowly turn the isolation valves back on, anti-clockwise, monitoring for any leaks around the tap body or handle. Check both the hot and cold water functions, observing for consistent temperature control and smooth operation. If any leaks are detected, tighten the relevant connections accordingly. If the problem persists, recheck the cartridge installation, ensuring it is correctly seated and the seals are intact.
Regular maintenance can prevent future cartridge issues. Periodically cleaning the aerator, a small mesh filter at the tip of the spout, can remove debris that might affect water flow. Hard water areas may benefit from occasional descaling to prevent mineral buildup within the tap mechanism. These simple preventative measures can extend the lifespan of the tap and its components.
While replacing a bathroom mixer tap cartridge is generally a straightforward process, complexities can arise depending on the specific tap model. Consulting a qualified plumber is advisable if any uncertainties or difficulties are encountered. Professional assistance ensures the repair is completed correctly, minimizing the risk of further damage and ensuring the longevity of the tap.

Replacing A Cartridge In Mixer Tap The

How To Change A Mixer Tap Cartridge The Sink Warehouse

How To Change A Single Lever Basin Cartridge

Single Lever Mono Basin Flow Cartridge Maintenance And Replacement

How To Replace A Mixer Cartridge Diy Plumbing Guide Fix Tap

How To Replace Your Tap Valve In Kitchen Or Bathroom

Replacing A Cartridge In Mixer Tap The

How To Replace The Cartridge In A Mixer Tap

Upperplumbers Short Bath Ceramic Cartridges 24 Spline 62003097 89 Replacement Jpg

Tap Cartridge Replacement Guide Step By
Related Posts