How to Change a Bathroom Sink Washer
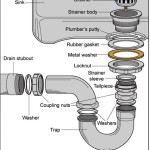
A leaking bathroom sink is a common plumbing problem that can be easily fixed by replacing the washer. The washer is a small rubber or plastic disk that creates a seal between the sink drain and the drainpipe. When the washer becomes worn or damaged, it can cause water to leak from the sink.
Replacing a bathroom sink washer is a simple task that can be completed in a few minutes. Here is a step-by-step guide on how to do it:
Step 1: Gather your tools and materials
To replace a bathroom sink washer, you will need the following tools and materials:
- New washer
- Adjustable wrench
- Pliers
- Bucket or bowl
- Cloth
Step 2: Turn off the water supply
Before you begin working on the sink, it is important to turn off the water supply. This will prevent water from leaking out of the sink while you are replacing the washer.
To turn off the water supply, locate the shutoff valves under the sink. The shutoff valves are usually located near the base of the sink, where the water supply lines connect to the sink. Turn the shutoff valves clockwise to turn off the water supply.
Step 3: Remove the drain stopper
Once the water supply is turned off, you can remove the drain stopper. The drain stopper is usually held in place by a screw or a nut. Use a screwdriver or a wrench to remove the screw or nut, and then pull the drain stopper out of the sink.
Step 4: Remove the old washer
Once the drain stopper is removed, you will be able to see the old washer. The old washer is usually located on the bottom of the drainpipe. Use a pair of pliers to grab the old washer and pull it off of the drainpipe.
Step 5: Install the new washer
Take the new washer and place it on the bottom of the drainpipe. Make sure that the new washer is facing the correct direction. The new washer should have a beveled edge that faces down towards the drainpipe.
Step 6: Reinstall the drain stopper
Once the new washer is installed, you can reinstall the drain stopper. Insert the drain stopper into the sink and tighten the screw or nut to hold it in place.
Step 7: Turn on the water supply
Once the drain stopper is reinstalled, you can turn on the water supply. Turn the shutoff valves counterclockwise to turn on the water supply. Check for leaks around the sink drain. If there are no leaks, the washer has been successfully replaced.
Tips:
- If you are not sure what size washer to buy, take the old washer to the hardware store with you. The hardware store will be able to help you find the correct size washer.
- If the old washer is damaged, it is important to inspect the drainpipe for damage. If the drainpipe is damaged, it will need to be replaced before you can install the new washer.
- If you are having trouble removing the old washer, you can use a pair of needle-nose pliers to grab the washer and pull it off of the drainpipe.

How To Replace A Tap Washer

How To Change A Washer On Mixer Tap Living By Homeserve

Can Washer Be Replaced In This Type Of Bathroom Sink Fauced Doityourself Com Community Forums

Leaking Tap Learn How To Change A Washer

Learn The 7 Diy Steps To Replace Your Tap Washer Blog

How To Change A Washer On Mixer Tap Bathroom Ideas

How To Change A Tap Washer

How To Change A Washer On Mixer Tap Bathroom Ideas

How To Change A Tap Washer Warehouse

Your Guide To Replacing Tap Washers Qs Supplies
Related Posts