How to Transform Your Bathroom: A Comprehensive Guide to Changing Your Vanity
Upgrading your bathroom vanity is an excellent way to revamp the overall aesthetic and functionality of your space. Whether you're seeking modern elegance or classic charm, a new vanity can breathe fresh life into your bathroom. However, embarking on this project requires careful planning and execution. Here's a step-by-step guide to help you navigate the process seamlessly:
1. Disassembly: Clearing the Way
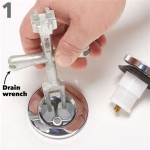
Before installing your new vanity, it's crucial to remove the existing one safely. Begin by turning off the water supply to your bathroom. Disconnect the water supply lines from the faucet and drain the water from the sink. Remove the mirror, light fixtures, and any drawers or shelves attached to the vanity. Loosen the nuts and bolts connecting the vanity to the wall and floor. Carefully lift the vanity off its base and set it aside for disposal.
2. Vanity Selection: Finding the Perfect Match
Choosing the right vanity is essential to ensure both form and function align with your needs. Consider the size and shape of your bathroom to determine the optimal dimensions for your new vanity. Evaluate the storage capacity offered by various models to accommodate your bathroom essentials. Additionally, pay attention to the style and finish of the vanity to ensure it complements the existing decor or introduces a desired aesthetic.
3. Preparation: Setting the Stage
Once you have your new vanity, prepare the space for its installation. Ensure the flooring is level and sturdy to support the weight of the vanity. If necessary, adjust the height of the vanity base using shims or extenders. Connect the water supply lines and drain to the appropriate fixtures on the new vanity. Test the faucets and drain to ensure they function correctly before proceeding.
4. Installation: Putting It All Together
Carefully lift the new vanity into place and align it on the prepared base. Secure the vanity to the wall and floor with the provided hardware. Ensure the vanity is level and stable by using a level and applying pressure as needed. Reconnect the water supply lines and drain. Install the drawers, shelves, mirror, and light fixtures to complete the assembly.
5. Finishing Touches: Personalizing Your Space
With the vanity installed, you can add personal touches to elevate your bathroom's ambiance. Install decorative hardware, such as knobs and drawer pulls, to enhance the vanity's style. Consider adding under-cabinet lighting to illuminate the space and create a warm and inviting atmosphere. Add a touch of greenery with plants or flowers to bring life into your bathroom. Finally, accessorize with a mirror, artwork, and other decorative elements to personalize your space.
Conclusion
Updating your bathroom vanity is a rewarding project that can transform the look and feel of your space. By following these steps carefully, you can ensure a smooth and successful installation. Remember to plan, measure, and take your time to achieve a stunning result. Whether you choose a timeless classic or embrace a modern design, a new vanity can breathe fresh life into your bathroom and create a space you'll love for years to come.

How To Install A Bathroom Vanity
:max_bytes(150000):strip_icc()/8_remove-sink-base-cabinet-56a4a26d3df78cf772835b30.jpg?strip=all "How To Remove A Bathroom Vanity Cabinet")
How To Remove A Bathroom Vanity Cabinet
:max_bytes(150000):strip_icc()/7_remove-vanity-top-56a4a26d3df78cf772835b2d.jpg?strip=all "How To Remove A Bathroom Vanity Cabinet")
How To Remove A Bathroom Vanity Cabinet

How To Install A Bathroom Vanity

Replace Vanity Top And Faucet Diy Network


How To Remove Replace A Vanity Top Easy Bathroom Sink Remodel

Diy Guide Find Out How To Replace A Bathroom Sink Ron Hazelton

How To Remove And Replace A Bathroom Sink Diy

How To Install A Bathroom Sink Step By Guide