How to Change a Washer in a Moen Bathroom Faucet
Changing a washer in a Moen bathroom faucet is an essential aspect of maintaining a functional bathroom. A worn-out washer can cause leaks, drips, and other issues that can waste water and damage your bathroom fixtures. Knowing how to change a washer is a simple and inexpensive solution to these problems.
Before beginning, it's important to understand the part of speech of the keyword "How to Change a Washer in a Moen Bathroom Faucet." In this case, "How to" is a verb that indicates the action of learning or performing a task. "Change" is another verb that denotes the action of replacing or altering something. "Washer" is a noun that refers to a small, disc-shaped component that creates a seal against water flow. "Moen" is a proper noun that identifies a specific brand of bathroom fixtures. "Bathroom" is a noun that indicates the location where the faucet is installed. "Faucet" is a noun that refers to the device used to control water flow from a plumbing fixture.
With this understanding in mind, the essential aspects of changing a washer in a Moen bathroom faucet include:
- Identifying the Type of Washer:
- Gathering Necessary Tools:
- Shutting Off the Water Supply:
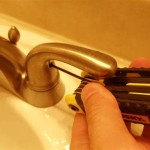
- Disassembling the Faucet:
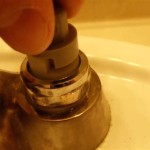
- Replacing the Washer:
- Reassembling the Faucet:
- Testing the Faucet:
There are different types of washers used in Moen bathroom faucets, so it's important to identify the correct one for your model. Common types include compression washers and cartridge washers.
You will need a few basic tools to change a washer, including an adjustable wrench, a Phillips screwdriver, and possibly a pair of pliers.
Before working on the faucet, it's crucial to shut off the water supply to prevent leaks and damage.
Depending on the type of faucet, you may need to remove the handle, spout, and cartridge to access the washer.
Once the old washer is removed, carefully insert the new washer into place, ensuring that it is properly seated.
Reassemble the faucet in reverse order and tighten all components securely.
Turn the water supply back on and check for leaks or drips. If there are any issues, repeat the process or contact a professional plumber.
Understanding these essential aspects will help you successfully change a washer in your Moen bathroom faucet and maintain a functional and water-efficient bathroom.

How Do I Replace My Moen Bathroom Faucet Cartridge

Fix A Moen Leaky Bathroom Faucet Quickly Save Time And Money

How To Fix A Dripping Moen Faucet Howtolou Com

How To Repair Remove Replace A Leaking Moen Shower Faucet Cartridge Valve With Single Knob 1225

How To Replace A Moen Bathroom Faucet Cartridge Ehow

Replace A Moen Kitchen Faucet Cartridge

How To Replace Repair A Leaky Moen Cartridge In Bathroom Set Of Faucets Single Lever Tips

Moen 4570 Handle Fell Off But Then I Fixed It Here S How Faucet Handles Bathroom Faucets

Moen Bathroom Faucet Repair 1225

Two Handle Kitchen Faucet Repair Moen
Related Posts