How to Change a Washer in a Bathroom Sink Tap
A leaking bathroom sink tap can be a frustrating issue, but it's one that can often be resolved with a simple repair. One of the most common causes of a leaking tap is a faulty washer. Fortunately, replacing a washer is a relatively straightforward task that can be completed in a few minutes with the right tools and materials.
Materials you will need:
- Replacement washer
- Adjustable wrench
- Phillips screwdriver
- Cloth or rag
- Bucket or container
Before you start working on the tap, it's important to turn off the water supply to the sink. This will prevent water from spraying out when you remove the washer.
Locate the water supply lines under the sink and turn off both the hot and cold water valves.
Step 2: Open the tapOpen the tap to release any remaining water from the lines and the tap.
Step 3: Remove the aerator (optional)Some taps have an aerator, which is a small screen that helps to aerate the water and reduce splashing. If your tap has an aerator, you'll need to remove it before you can access the washer.
Use a wrench to unscrew the aerator from the tap.
Step 4: Remove the handleThe handle is usually held in place by a screw. Use a Phillips screwdriver to remove the screw and pull the handle off the tap.
Step 5: Remove the packing nutThe packing nut is a large nut that holds the tap in place. Use a wrench to loosen the packing nut and remove it from the tap.
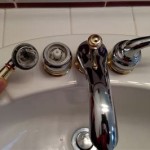
Step 6: Remove the washerThe washer is a small rubber or plastic disc that sits inside the packing nut. Use a cloth or rag to grasp the washer and pull it out.
Step 7: Inspect the seatThe seat is the surface of the tap that the washer seals against. Inspect the seat for any damage or wear. If the seat is damaged, you may need to replace it before installing the new washer.
Step 8: Install the new washerPlace the new washer on the seat. Make sure that the washer is properly seated and that there are no gaps between the washer and the seat.
Step 9: Reinstall the packing nutPlace the packing nut back on the tap and tighten it using a wrench. Do not overtighten the packing nut, as this can damage the tap.
Step 10: Reinstall the handlePlace the handle back on the tap and secure it with the screw.
Step 11: Reinstall the aerator (if removed)If you removed the aerator, screw it back onto the tap.
Step 12: Turn on the water supplyTurn on the water supply and check for any leaks. If there are any leaks, tighten the packing nut further until the leak stops.
Step 13: Adjust the handleIf the handle is not fully open, use a wrench to loosen the packing nut slightly and adjust the handle until it is in the desired position.

How To Replace A Tap Washer

Leaking Tap Learn How To Change A Washer

Learn The 7 Diy Steps To Replace Your Tap Washer Blog

How To Change Bathroom Taps Everything You Need Know

How To Change A Tap Washer

How To Change A Washer On Mixer Tap Bathroom Ideas

How To Change A Tap Washer Warehouse

How To Open The Tap Replace Washer Bunnings Work Community

How To Replace A Tap Washer In 10 Easy Steps Hpg Solutions

How To Change A Tap Washer 12 Steps With Pictures Wikihow