How to Clean an Aerator on a Bathroom Faucet
A bathroom faucet aerator is a small, usually chrome-plated device located at the end of the spout. Its purpose is to blend air with the water stream, creating a more even and consistent flow. This aeration process reduces splashing and improves water efficiency by allowing you to use less water while maintaining a comfortable flow. Over time, however, aerators can become clogged with mineral deposits, debris, and other contaminants, leading to reduced water pressure, uneven flow, and potentially a sputtering or dripping faucet. Cleaning your aerator regularly is essential for ensuring optimal performance and preventing more serious issues.
Steps for Cleaning a Bathroom Faucet Aerator
Before you begin, gather your supplies: a small screwdriver, a small bowl or container, a toothbrush, a piece of cloth, and white vinegar. The cleaning process typically involves removing the aerator from the faucet, disassembling it, cleaning the components, and reassembling them before reinstalling the aerator. Here are detailed instructions:
1. Shut Off the Water Supply
To avoid flooding your bathroom, turn off the water supply to the faucet. Locate the shut-off valve beneath the sink or in the wall and turn it clockwise to close the water flow. You may also need to turn off the main water supply if your faucet is the only one connected to the valve.
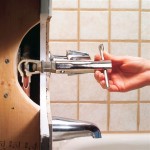
2. Remove the Aerator
Locate the aerator at the end of the faucet spout. It is typically a small, round or cylindrical device with a threaded connection. Use a screwdriver to unscrew the aerator from the faucet spout. Some aerators are held in place by a small plastic or metal ring that can be removed to access the threaded portion. If you are struggling to remove the aerator, you can try using pliers or a wrench, but be careful not to overtighten them.
3. Disassemble the Aerator
Once the aerator is removed, carefully disassemble it. The aerator usually consists of a few components, including a screen or filter, a mesh screen, an O-ring, and a plastic or metal housing. Use your fingers or a small screwdriver to gently separate the components. Be sure to note the order of the parts for easy reassembly later.
4. Clean the Components
After disassembling the aerator, place all the components in the small bowl or container filled with white vinegar. Allow them to soak for at least 30 minutes or overnight. The vinegar will help to dissolve mineral deposits and other debris trapped in the aerator. You can use an old toothbrush to gently scrub the components during the soaking process, removing any stubborn sediment. If the water pressure is still low after cleaning, you may need to use a stronger cleaning solution or a pickling solution to remove stubborn deposits. Avoid using bleach or harsh chemicals, as they can damage the aerator.
5. Rinse and Reassemble
After soaking in vinegar, remove the components from the solution and rinse them thoroughly with water. Ensure all vinegar residue is removed. Now, carefully reassemble the components in their original order. Take your time and ensure each part is correctly positioned. When placing the O-ring, make sure it is properly seated in the groove of the aerator housing. A misaligned O-ring can cause leaks.
6. Reinstall the Aerator
Once the aerator is reassembled, screw it back onto the faucet spout. Tighten it securely, but avoid overtightening. If the aerator is too tight, it can damage the faucet or make it difficult to remove in the future. Turn the water supply back on and check for any leaks. If you notice any leaks, you may need to tighten the aerator further or replace the O-ring.
Maintaining Your Aerator
While cleaning your aerator is essential for maintaining optimal faucet performance, there are additional steps you can take to prevent clogging and extend its lifespan:
1. Install a Water Filter
Consider installing a whole-house water filter or a faucet-mounted filter. These filters can remove minerals, sediment, and other impurities from the water, reducing the likelihood of clogging in your aerator.
2. Use a Water Softener
If you have hard water, installing a water softener can effectively reduce mineral buildup in your aerator and other plumbing fixtures. Water softeners remove calcium and magnesium ions, which are the primary contributors to hard water deposits.
3. Clean Regularly
To keep your aerator free from debris and maintain optimal faucet performance, it is advisable to clean it every few months. You can also check the aerator for any signs of blockage or malfunction and clean it as needed.
Conclusion
Cleaning your bathroom faucet aerator is a simple but crucial task that can significantly improve the performance of your faucet and prevent future problems. By following these steps, you can ensure that your faucet operates smoothly and efficiently, providing you with a pleasant and comfortable bathroom experience. Remember to check your aerator regularly and clean it as needed to maintain its functionality.

How To Clean Your Faucet Aerator Crawford Mech

How To Remove The Faucet Aerator Ozone Microbubble Clean Systems For Bathroom Kitchen Manufacturer Strongco

How To Clean Debris Out Of A Bathroom Faucet Aerator Sbw 70 Sean Moenkhoff

How To Clean An Aerator On Kitchen Or Bathroom Faucet

How To Clean Your Faucet Aerator Zn Construction

How To Clean Faucet Aerator Simpson Plumbing Llc

How To Clean Faucet Aerator Simpson Plumbing Llc

How To Clean A Faucet Aerator And Sink Sprayer Dummies

How To Clean Debris Out Of A Bathroom Faucet Aerator Sbw 70 Sean Moenkhoff

Dirty Faucet Aerator How To Remove Clean Aerators
Related Posts