How to Clean Around Bathroom Taps: Essential Aspects for Spotless Fixtures
Maintaining pristine bathroom fixtures is essential for a hygienic and inviting space. One area that often requires attention is the area around the taps, where mineral deposits, soap scum, and grime can accumulate, compromising aesthetics and functionality.
Cleaning around bathroom taps effectively involves several crucial aspects that ensure thorough results and prevent damage. This article will delve into the essential aspects of cleaning around bathroom taps, providing a comprehensive guide to achieve sparkling fixtures.
Part of Speech Identification:
The keyword phrase "How to Clean Around Bathroom Taps" serves as an
infinitive phrase
, denoting an action or process. This understanding informs the content's focus on the steps and techniques involved in effectively cleaning around bathroom taps. ### Essential Aspects of Cleaning Around Bathroom Taps1. Selecting the Right Cleaning Solution:
Choosing the appropriate cleaning solution is crucial to avoid damaging the tap's finish. Mild dishwashing liquid or specialized bathroom cleaner can effectively remove soap scum and dirt without causing discoloration. Avoid harsh cleaners like bleach or abrasive cleaners, as they can scratch the surface.
2. Gathering Necessary Tools:
In addition to the cleaning solution, a few simple tools can facilitate efficient cleaning. A soft cloth, a toothbrush, and a small scrub brush can reach into tight corners and gently remove grime without damaging the tap's exterior.
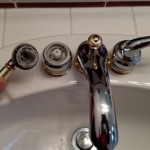
3. Protecting the Base of the Tap:
Before applying any cleaning solution, place a damp cloth around the base of the tap to prevent runoff from pooling on the countertop or shower floor. This prevents water damage and unsightly stains.
4. Cleaning the Tap Surface:
Apply the cleaning solution to the tap surface and gently wipe in a circular motion with a soft cloth. For stubborn stains, a toothbrush or small scrub brush can be used, always moving in a circular pattern to avoid scratching.
5. Removing Mineral Deposits:
Hard water can leave mineral deposits around the tap's base. To remove these deposits, apply a vinegar and water solution (equal parts) to the affected areas. Let it sit for 15 minutes, then scrub gently before rinsing with clean water.
6. Drying the Tap:
Once the tap is thoroughly cleaned, use a dry cloth to absorb excess moisture and prevent water spots. This step also ensures that the tap's finish remains bright and shiny.
### ConclusionBy following these essential aspects of cleaning around bathroom taps, you can maintain pristine fixtures that enhance the overall aesthetics and functionality of your bathroom. Regular cleaning using the appropriate methods and tools will prevent unsightly stains, mineral deposits, and grime accumulation, ensuring sparkling taps for years to come.

How To Clean Limescale From Taps Living By Homeserve

How To Clean Taps 4 Home Remedies For Sparkling

How To Clean Bathroom Taps Harpic

How To Clean Taps 4 Home Remedies For Sparkling

Cleaning The Best Way To Remove Stubborn Limescale Deposits From Your Taps Express Co

How To Clean Bathroom Taps And Maintain For Long Lasting Shine

Removing And Preventing Limescale Benjamin Franklin Plumbing

Clean Bathroom Taps How To Do Home Easy Tap Cleaning Routine Tips And Tricks

Tap Cleaner Simple And Effective Cleaning Ideas For Your Home

Ecofriendly Way To Clean Your Tap Remove Gunk Around The Sink