How to Disassemble a Delta Bathroom Faucet
Disassembling a Delta bathroom faucet is relatively straightforward and can be completed with a few basic tools. Here is a step-by-step guide to help you disassemble your Delta bathroom faucet:
Step 1: Gather Your Tools
Before you begin, gather the following tools:
- Adjustable wrench
- Phillips head screwdriver
- Flat head screwdriver
- Bucket or container for parts
- Cloth or rag
- Safety glasses
Step 2: Turn Off the Water Supply
To prevent water from leaking during the disassembly process, turn off the water supply to the faucet. You can usually do this by locating the valves under the sink or behind the faucet. Turn the valves clockwise to turn off the water supply.
Step 3: Remove the Aerator
The aerator is a small, screen-like attachment at the end of the faucet spout. It helps to mix air with the water to create a more even flow. To remove the aerator, use a wrench to loosen the retaining nut that holds it in place. Once the nut is loose, you can unscrew the aerator by hand.
Step 4: Remove the Handle
The handle is the part of the faucet that you use to turn on and off the water. To remove the handle, use a Phillips head screwdriver to remove the screws that hold it in place. Once the screws are removed, you can pull the handle off the faucet.
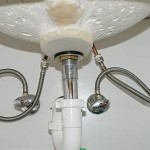
Step 5: Remove the Cartridge
The cartridge is the heart of the faucet and controls the flow of water. To remove the cartridge, use a flat head screwdriver to pry off the cap that covers the cartridge. Once the cap is removed, you can use a wrench to loosen the cartridge housing. Once the housing is loose, you can remove the cartridge by pulling it straight out of the faucet.
Step 6: Clean the Parts
Once you have disassembled the faucet, it is a good idea to clean the parts before reassembling it. You can clean the parts with a mild detergent and water. Be sure to rinse the parts thoroughly and dry them completely before reassembly.
Step 7: Reassemble the Faucet
Once the parts are clean and dry, you can reassemble the faucet. To do this, follow the steps in reverse order. Start by inserting the cartridge into the faucet body. Then, tighten the cartridge housing. Next, replace the handle and secure it with the screws. Finally, replace the aerator and tighten the retaining nut.
Step 8: Turn on the Water Supply
Once the faucet is reassembled, turn on the water supply. Check for leaks around the faucet. If there are any leaks, tighten the connections until the leaks stop.
Your Delta bathroom faucet is now successfully disassembled and reassembled! If you follow these steps carefully, you can easily repair or replace any worn-out parts in your faucet. However, if you are uncomfortable working with plumbing, it is always best to consult with a qualified plumber for assistance.

How To Rebuild A Delta Single Handle Faucet

Simple Ways To Fix A Leaky Delta Bathroom Sink Faucet

Simple Ways To Fix A Leaky Delta Bathroom Sink Faucet

How To Repair Leaking Dripping Delta Faucet Diyplumbing Serviceplumbing Tappplumbing

Simple Ways To Fix A Leaky Delta Bathroom Sink Faucet

How To Repair A Delta Tub Shower Valve

Tips Tricks Remove Delta 2 Handle 4 In Bathroom Sink Faucet With Bar 5 21 18

Simple Ways To Fix A Leaky Delta Bathroom Sink Faucet

How To Replace A Two Handle Faucet Delta Blog

Repair Parts For One And Two Handle Delta Bathroom Faucets