Essential Aspects of Fitting a Bathroom Sink Unit
Fitting a bathroom sink unit is a crucial aspect of bathroom renovation or installation. It involves various essential aspects, ranging from proper measurements to secure installation. Understanding these aspects ensures a functional and aesthetically pleasing bathroom sink.
This article focuses on the critical aspects of fitting a bathroom sink unit, providing guidance on the necessary steps and considerations. It aims to equip you with the knowledge and understanding required for a successful DIY project or the ability to effectively communicate your requirements to a professional installer.
1. Measurements and Preparation
Accurate measurements are essential before purchasing and fitting a bathroom sink unit. Determine the space available, including the width and depth of the countertop, the distance from the backsplash to the front edge, and the height from the floor to the countertop. These measurements will ensure that the sink unit fits seamlessly and aligns with the existing plumbing.
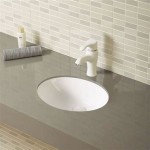
2. Choose the Right Sink Unit
Selecting the appropriate sink unit depends on the available space, personal preferences, and bathroom style. Consider the material, size, shape, and number of basins required. Opt for a sink unit that complements the countertop material and overall bathroom décor.
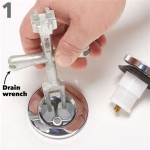
3. Remove the Old Sink Unit (if applicable)
If replacing an existing sink unit, carefully disconnect the water supply lines and drainpipe. Remove any sealants or adhesives around the sink and countertop. Gently lift the sink unit and remove it. Clean the countertop and surrounding area thoroughly before installing the new sink unit.
4. Install the Sink Unit
Align the new sink unit on the countertop. Apply a bead of silicone sealant around the rim of the sink and carefully place it in the countertop opening. Press down firmly to secure the sink unit. Wipe away any excess sealant.
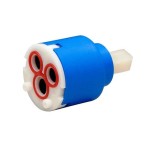
5. Connect the Water Supply Lines
Attach the water supply lines to the designated valves on the sink unit. Use flexible hoses for easy connection and to accommodate any minor adjustments. Ensure that the connections are tight and free of leaks.
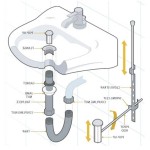
6. Connect the Drainpipe
Fit the pop-up drain assembly to the sink unit. Connect the drainpipe to the drain outlet of the sink unit and secure it with a slip nut. Ensure that the connection is snug to prevent leaks.
7. Secure and Seal
Once the water supply lines and drainpipe are connected, apply a bead of silicone sealant around the edges of the sink unit where it meets the countertop. This will provide a watertight seal and prevent moisture damage.
Conclusion
Fitting a bathroom sink unit requires careful attention to measurements, proper component selection, and secure installation. By following these essential aspects outlined in this article, you can achieve a functional, aesthetically pleasing, and leak-free bathroom sink unit.

How To Install A Vanity Unit Victorian Plumbing

How To Install A Vanity Unit Wash Basin Bathroom Ideas

10 Easy Steps For Installing A Bathroom Vanity Unit Victoriaplum Com

How To Fit A Vanity Unit Big Bathroom

How To Install Bathroom Vanity Units That Make Your Friends Jealous

How To Diy A Bathroom Vanity Unit Wood Create

Bathroom With Internal Draw Sensor Bottom Light Anthracite Tapron Co

6 Reasons To Include A Vanity Unit In Your Bathroom Big

The Ultimate Guide To Bathroom Sinks And Basins R2 Bathrooms

800 Bathroom Vanity Sink Unit Cabinet With Basin Black Steel Oak Freestanding Loft Industrial Brook Diy At B Q
Related Posts