How to Fix a Bathroom Sink Handle
Bathroom sink handles are simple mechanisms, but they can develop problems that make them difficult to use. The most common issues are caused by loose or worn-out parts, which can lead to leaks, drips, or difficulty turning the handle. Fortunately, these problems can often be fixed with a few simple tools and some basic knowledge.
Here are the steps on how to fix a bathroom sink handle:
1. Identify the problem
The first step is to identify the problem with the handle. This can be done by observing the symptoms. For example, if the handle is loose, it may wiggle or move easily when turned. If the handle is difficult to turn, it may be jammed or have a worn-out part.
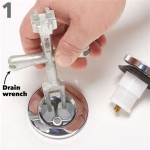
2. Gather your tools
Once you have identified the problem, you will need to gather the necessary tools to fix it. These tools may include a screwdriver, a wrench, and a pair of pliers. You may also need some replacement parts, such as a new washer or a new handle.
3. Turn off the water supply
Before you begin working on the handle, you will need to turn off the water supply to the sink. This is important to prevent flooding and damage to your home. To turn off the water supply, simply locate the shut-off valves under the sink and turn them clockwise.
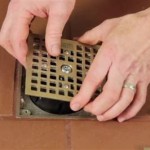
4. Remove the handle
Once the water supply is turned off, you can remove the handle. The method for removing the handle will vary depending on the type of handle you have. Most handles are held on by a screw or a bolt, which can be removed with a screwdriver or a wrench. Once the screw or bolt is removed, the handle should come off easily.
5. Inspect the handle
Once the handle is removed, you should inspect it for damage. Look for any loose or worn-out parts, such as the washer or the O-ring. If you find any damaged parts, they will need to be replaced.
6. Replace the damaged parts
If you have identified any damaged parts, you will need to replace them. To replace a washer, simply remove the old washer and replace it with a new one. To replace an O-ring, you will need to remove the old O-ring and install a new one. Be sure to lubricate the O-ring with a little bit of petroleum jelly before installing it.
7. Reassemble the handle
Once the damaged parts have been replaced, you can reassemble the handle. To do this, simply insert the handle into the base and tighten the screw or bolt. Be careful not to overtighten the screw or bolt, as this could damage the handle.
8. Turn on the water supply
Once the handle is reassembled, you can turn on the water supply and test the handle. If the handle works properly, then you have successfully fixed it.
Fixing a bathroom sink handle is a simple task that can be completed in a matter of minutes. By following the steps outlined above, you can easily fix any problems with your bathroom sink handle and keep it working properly.

How To Fix A Bathroom Faucet 14 Steps

How Do I Replace Bathroom Sink Faucet Handles Cleaning More

Diy How To Replace A Bathroom Sink Faucet Remove Install

How To Change The Handle Rotation On A Faucet

How To Fix A Leaky Single Handle Sink Faucet

Simple Ways To Fix A Leaky Delta Bathroom Sink Faucet

4 Easy Ways To Fix A Leaky Bathroom Sink Faucet With Double Handle

A Person Turning Shut Off Valve Underneath Bathroom Sink Kitchen Faucet With Sprayer Install Replacing

How To Replace A Bathroom Faucet Home Repair Tutor

How To Remove And Install A Bathroom Faucet
Related Posts