How To Fix A Bathroom Tap Washer
Maintaining your bathroom tap in good condition is essential to ensure a comfortable and efficient water usage experience. A faulty tap washer can lead to water leaks, dripping noises, and increased water bills. Fixing a bathroom tap washer is a relatively simple task that can be completed with a few basic tools and materials.
This article will provide a step-by-step guide on how to fix a bathroom tap washer, covering the essential aspects of the process. We will discuss the tools and materials needed, the steps involved in removing the old washer, and the installation of the new washer. By following these instructions carefully, you can effectively resolve tap washer issues and restore the proper functioning of your bathroom tap.
Tools and Materials Required
Before embarking on the repair process, it is important to gather the necessary tools and materials. These include:
- Adjustable wrench or spanner
- Flathead screwdriver
- Replacement tap washer (size and type depending on the specific tap)
- Plumber's tape (optional)
- Cloth or towel (for wiping)
Safety Precautions
Before starting any plumbing work, it is essential to take necessary safety precautions to avoid potential hazards. Turn off the water supply to the tap by closing the isolation valve or main water valve. Open the tap to release any residual water pressure and place a cloth or towel around the base of the tap to catch any water spillage.
Step-by-Step Guide
1. Remove the Tap Handle
Use the flathead screwdriver to pry off the handle cover, typically located at the base of the tap handle. Once the cover is removed, you may need to unscrew a retaining screw or nut to detach the handle from the tap body.
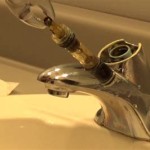
2. Remove the Cartridge or Spindle
Once the handle is removed, you will need to remove the cartridge or spindle assembly. This can be done by unscrewing the retaining nut or collar located beneath the handle using the adjustable wrench. If there is no retaining nut, you may need to use the flathead screwdriver to carefully pry out the cartridge or spindle.
3. Replace the Tap Washer
With the cartridge or spindle removed, you will be able to access the tap washer. Use a pair of pliers or your fingers to remove the old washer and replace it with the new one. Ensure that the new washer is properly seated and facing the correct direction.
4. Reinstall the Cartridge or Spindle
Once the new washer is installed, carefully insert the cartridge or spindle back into the tap body. Tighten the retaining nut or collar securely using the adjustable wrench.
5. Reattach the Tap Handle
Align the tap handle with the spindle or cartridge and slide it back onto the tap body. Secure the handle by tightening the retaining screw or nut and replace the handle cover.
6. Turn on the Water Supply
Turn on the water supply to the tap and check for any leaks. If there are no leaks, your tap washer repair is complete.
Conclusion
Fixing a bathroom tap washer is a straightforward task that can be easily accomplished with the right tools and a little bit of patience. By following the steps outlined in this guide, you can effectively resolve tap washer issues and restore the proper functioning of your bathroom tap. Regular maintenance and prompt repairs can help extend the lifespan of your bathroom tap and ensure a comfortable and efficient water usage experience.
If you encounter any difficulties during the repair process or if the tap continues to leak after replacing the washer, it is advisable to consult a professional plumber for further assistance.

How To Replace A Tap Washer

How To Change A Tap Washer Warehouse

Leaking Tap Learn How To Change A Washer

How To Change A Washer On Mixer Tap Living By Homeserve

Learn The 7 Diy Steps To Replace Your Tap Washer Blog

Disassemble Reassemble A Tap Diy Plumbing Guides Fix

How To Change A Tap Washer

How To Change Bathroom Taps Everything You Need Know

Diy Guide To Fixing Your Leaking Taps Better Homes And Gardens

Your Guide To Replacing Tap Washers Qs Supplies
Related Posts