How To Fix A Delta Bathroom Faucet Handle
Delta bathroom faucets are a popular choice for homeowners due to their stylish designs and reliable performance. However, like any other plumbing fixture, Delta faucets can develop problems over time, such as a loose or leaking handle. If you're experiencing this issue, don't worry—fixing a Delta bathroom faucet handle is a relatively simple task that can be completed in a few minutes.
In this article, we'll provide you with step-by-step instructions on how to fix a Delta bathroom faucet handle. We'll also discuss some of the common causes of a loose or leaking handle and how to prevent them from happening in the future.
Identifying the Problem
Before you begin repairing your Delta bathroom faucet handle, it's important to identify the cause of the problem. The most common causes of a loose or leaking handle are:
- Worn-out O-rings or seals
- Loose screws
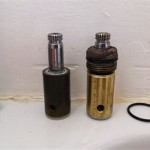
- Damaged cartridge
- Faulty handle
Once you've identified the cause of the problem, you can begin the repair process.
Tools and Materials
Before you begin, you'll need to gather the following tools and materials:
- Phillips screwdriver
- Flathead screwdriver
- Wrench
- Replacement O-rings or seals (if necessary)
- Replacement cartridge (if necessary)
- Replacement handle (if necessary)
Once you have all of your tools and materials, you're ready to begin the repair process.
Step-by-Step Instructions
Follow these step-by-step instructions to fix a Delta bathroom faucet handle:
1. Turn off the water supply. This is important to do before you begin any repairs. You can turn off the water supply by turning the valves under the sink. 2. Remove the handle. The handle is usually held in place by a screw. Use a Phillips screwdriver to remove the screw and then pull the handle straight up to remove it. 3. Inspect the O-rings or seals. The O-rings or seals are located inside the handle. Inspect them for any signs of wear or damage. If the O-rings or seals are worn or damaged, they will need to be replaced. 4. Inspect the cartridge. The cartridge is located inside the faucet body. Remove the cartridge by unscrewing it counterclockwise. Inspect the cartridge for any signs of damage. If the cartridge is damaged, it will need to be replaced. 5. Inspect the handle. The handle may be damaged or faulty. If the handle is damaged or faulty, it will need to be replaced. 6. Reassemble the faucet. Once you have replaced the O-rings or seals, cartridge, and/or handle, you can reassemble the faucet. Make sure to tighten all of the screws securely. 7. Turn on the water supply. Slowly turn on the water supply and check for any leaks. If there are no leaks, your faucet is now repaired.Conclusion
Fixing a Delta bathroom faucet handle is a relatively simple task that can be completed in a few minutes. By following the step-by-step instructions in this article, you can easily repair your faucet and get it back to working properly.

How To Fix Leaky Bathroom Handle Delta Faucet Model 4530 Series Hard Water

How To Rebuild A Delta Single Handle Faucet

Tips Tricks Remove Delta 2 Handle 4 In Bathroom Sink Faucet With Bar 5 21 18

Simple Ways To Fix A Leaky Delta Bathroom Sink Faucet

How To Replace A Two Handle Faucet Delta Blog

How To Fix A Leaky Delta Two Handle Faucet

How To Fix A Leaky Delta Style Bathroom Faucet

Simple Ways To Fix A Leaky Delta Bathroom Sink Faucet

How To Get The Gunk Out Of Your Faucet

How To Tighten A Loose Delta Bathroom Sink Faucet Spout Handles 5 22 18
Related Posts