How To Fix A Dripping Bathroom Mixer Tap
A dripping bathroom mixer tap can be a persistent annoyance and a source of wasted water. Fortunately, fixing the issue is often within the realm of DIY, saving the cost of calling a plumber. This guide provides a step-by-step approach to diagnose and repair common causes of dripping mixer taps.
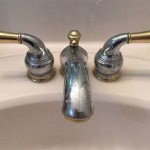
1. Identify the Dripping Tap Type
Bathroom mixer taps come in various designs, including single-lever, dual-lever, and thermostatic mixers. Understanding the specific type is crucial for correctly dismantling and reassembling the tap. Single-lever mixers control both temperature and flow with one handle, while dual-lever mixers use separate hot and cold handles. Thermostatic mixers maintain a pre-set temperature.
2. Gather Necessary Tools and Materials
Before beginning any repair work, gather the required tools. Common tools include a flathead screwdriver, Phillips head screwdriver, adjustable wrench, Allen keys (hex keys), and pliers. A basin wrench, designed for accessing tight spaces under the sink, is also highly recommended. Replacement parts such as O-rings, cartridges, and washers will depend on the tap's specific make and model. Having these ready beforehand streamlines the repair process.
3. Turn Off the Water Supply
This is the most crucial initial step. Locate the isolation valves under the sink, supplying hot and cold water to the tap. Turn both valves clockwise to shut off the water supply completely. Turn the tap on to release any remaining water in the pipes. This prevents unwanted water flow during the repair and minimizes the risk of water damage.
4. Disassemble the Tap Handle
The method for removing the tap handle varies depending on the tap design. Some handles have a small screw hidden beneath a decorative cap. This cap can usually be pried off with a flathead screwdriver to access the screw. Other handles may require an Allen key to loosen a grub screw located underneath or on the side. Once the screw is removed, the handle can be lifted off the tap body.
5. Access and Inspect the Cartridge or Valve
After removing the handle, the cartridge or valve assembly is usually visible. Single-lever mixers typically use a cartridge, while dual-lever mixers utilize separate valves for hot and cold water. Inspect the cartridge or valves for signs of wear, damage, or mineral build-up. A worn-out cartridge or valve is the most common cause of dripping taps. Note the make and model number of the cartridge or valve for purchasing a suitable replacement.
6. Replace Worn Parts
If the cartridge or valve appears worn or damaged, replacement is necessary. Carefully remove the old cartridge or valve using an adjustable wrench or appropriate tool based on the design. Ensure the replacement part is an exact match to the original. Install the new cartridge or valve, ensuring it is seated correctly in the tap body. Tighten the securing nut or screw without overtightening, which can damage the tap.
7. Check and Replace O-rings and Washers
O-rings and washers are essential for creating a watertight seal within the tap. During disassembly, inspect these small rubber components for wear, cracks, or deterioration. Replace any damaged O-rings or washers with new ones of the same size and material. Lubricating new O-rings with silicone grease can aid in installation and ensure a proper seal.
8. Reassemble the Tap
Once the necessary repairs and replacements are completed, reassemble the tap in reverse order of disassembly. Replace the handle, ensuring it is securely fastened. Tighten any screws or grub screws removed earlier, but avoid overtightening. Replace any decorative caps.
9. Turn the Water Supply Back On
Slowly turn the isolation valves counterclockwise to restore the water supply to the tap. Check for any leaks around the tap body, handle, and connections. If leaks persist, recheck the connections and ensure all components are properly tightened and sealed. If the problem continues, it may be necessary to consult a qualified plumber.

How To Fix A Dripping Tap Living By Homeserve

Bath Shower Mixer Diverter Maintenance And Replacement

How To Change A Washer On Mixer Tap Living By Homeserve

Bath Shower Mixer Ceramic Disc Flow Valve Maintenance And Replacement

How To Fix A Dripping Tap Admiral

How To Fix A Dripping Tap

How To Fix A Dripping Tap In Seconds Hometree

How To Fix A Leaking Mixer Tap Channel Lfd

Here S Why Your New Bathroom Tap Is Leaking And How To Fix It Plumber Hills District

How To Fix A Leaking Mixer Tap 6 Steps Guide Tunnel Vision