How to Fix a Dripping Faucet in the Bathroom Sink
A dripping faucet is not only annoying, but it can also waste a significant amount of water over time. If you have a dripping faucet in your bathroom sink, there are a few simple steps you can take to fix it yourself. In this article, we'll walk you through the essential aspects of how to fix a dripping faucet in the bathroom sink.
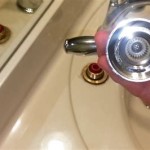
1. Determine the Type of Faucet
The first step is to determine the type of faucet you have. There are two main types of faucets: compression faucets and cartridge faucets. Compression faucets have a washer that seals against the valve seat to stop the flow of water. Cartridge faucets have a cartridge that contains both the washer and the valve seat.
To determine the type of faucet you have, look at the handle. If the handle has a single handle that moves up and down, you have a compression faucet. If the handle has two handles that move side to side, you have a cartridge faucet.
2. Gather the Necessary Tools
Once you know the type of faucet you have, you can gather the necessary tools. For compression faucets, you will need a wrench and a screwdriver. For cartridge faucets, you will need a wrench and a pair of pliers.
3. Turn Off the Water Supply
Before you start working on the faucet, you need to turn off the water supply. There are usually two valves under the sink that control the hot and cold water supply. Turn both valves clockwise to shut off the water.
4. Remove the Handle
Once the water supply is turned off, you can remove the handle. For compression faucets, simply unscrew the handle with the screwdriver. For cartridge faucets, you will need to use the wrench to loosen the nut that holds the handle in place. Once the nut is loose, you can pull the handle off.
5. Replace the Washer or Cartridge
Once the handle is removed, you can replace the washer or cartridge. For compression faucets, simply remove the old washer and replace it with a new one. For cartridge faucets, you will need to use the wrench to unscrew the old cartridge and replace it with a new one.
6. Reassemble the Faucet
Once the washer or cartridge is replaced, you can reassemble the faucet. For compression faucets, simply screw the handle back on. For cartridge faucets, you will need to insert the new cartridge into the faucet body and tighten the nut. Once the faucet is reassembled, turn the water supply back on and check for leaks.
7. Call a Plumber
If you are unable to fix the dripping faucet yourself, you can always call a plumber. A plumber will be able to diagnose the problem and make the necessary repairs.

4 Easy Ways To Fix A Leaky Bathroom Sink Faucet With Double Handle

How To Fix A Bathroom Faucet 14 Steps

Properly Fixing A Leaky Sink Faucet Wallside Windows

5 Reasons Your Faucet Is Dripping Water How To Fix It

Part 1 Of 2 How To Fix A Dripping Faucet

How To Fix A Leaky Faucet True Value

How To Fix A Dripping Moen Faucet Howtolou Com

5 Reasons Your Faucet Is Dripping Water How To Fix It

How To Fix A Leaky Faucet Guides For Every Design And Style

Water Dripping From Faucet Why And How To Fix
Related Posts