How to Fix a Leaky Bathroom Faucet Base
If your bathroom faucet is leaking from the base, you'll need to take steps to fix it promptly to prevent water damage and high water bills. Don't fret; it's a relatively straightforward repair that you can handle yourself with the right tools and a few easy steps.
Essential Tools and Materials
Before you begin, gather the necessary tools and materials:
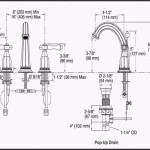
* Adjustable wrench or channel-lock pliers * New O-rings (small rubber gaskets) * Plumber's tape * Flashlight (optional, for better visibility) * Soft cloth or paper towelsStep-by-Step Guide
Once you have your tools and materials ready, follow these steps:
1. Turn Off the Water Supply: Begin by turning off the water supply to the faucet. Locate the shut-off valves under the sink or behind the access panel in the wall. 2. Remove the Faucet Handle: Using an adjustable wrench or channel-lock pliers, gently loosen and remove the faucet handle. Be careful not to overtighten. 3. Inspect the O-rings: Once the handle is removed, you'll expose the O-rings, which are the small rubber gaskets that create a seal between the faucet body and the base. Inspect the O-rings; if they're cracked, worn, or damaged, they need to be replaced. 4. Wrap Plumber's Tape: Apply a few wraps of plumber's tape around the threads of the faucet base where it connects to the sink. This tape creates a tighter seal and helps prevent leaks. 5. Replace the O-rings: Carefully remove the old O-rings and replace them with new ones. Make sure the new O-rings are the correct size and are properly seated in place. 6. Reassemble the Faucet: Place the faucet base back onto the sink and tighten it securely using an adjustable wrench or channel-lock pliers. Reinstall the faucet handle and tighten it until it's snug. 7. Turn on the Water Supply: Open the shut-off valves to restore the water supply to the faucet. 8. Check for Leaks: Turn on the faucet and check for any leaks at the base. If there's still a leak, you may need to adjust the tightness of the faucet base or the handle or inspect the O-rings again.Tips and Precautions
Here are some additional tips and precautions to ensure a successful repair:
* Use a flashlight to illuminate the work area and make it easier to see the O-rings. * If you're not confident about the repair, it's best to seek professional assistance from a plumber. * Don't overtighten the faucet components, as this can damage the parts or the sink. * If the leak persists after following the steps above, there may be an underlying issue with the faucet or the plumbing system, requiring further inspection and repair.
How To Fix A Bathroom Faucet 14 Steps

How To Fix A Bathroom Faucet 14 Steps

Simple Ways To Fix A Leaky Delta Bathroom Sink Faucet

Sealing A Leaky Faucet Base Plate Fix It Fast In 4 Steps Or Less

How To Fix A Leaky Faucet True Value

How To Fix A Bathroom Faucet 14 Steps

How To Fix A Leaky Faucet Guides For Every Design And Style

Kitchen Faucet Leaks At The Base Easy 5 Min Fix

How To Fix A Leaking Bathroom Faucet Quit That Drip

How To Fix Loose Sink Faucet
Related Posts